

Whirlpool 4396006RW Genuine OEM Dryer Vent Elbow Connector, 90-Degree Close-Turn, 4-Inch Aluminum Space-Saver Accessory
Winix air purifier filter replacement procedures are vital for maintaining healthy air quality inside your home during 2026. If your machine is starting to smell dusty, work slowly, or shows a persistent red filter alert, our detailed guide will resolve your issue easily. Follow our proven instructions to get those absolute best results today fast!
Understanding Your Winix Air Purifier Filter Replacement Options
Maintaining a clean and fully functional air purifier is one of the most proactive steps you can take to protect your family’s long-term respiratory health. Over several months of continuous operation, your system works tirelessly to capture billions of microscopic pollutants, including toxic gases, pollen, fine dust, and pet dander. However, once the fibrous media within these cleaning barriers becomes completely saturated with debris, the machine’s overall airflow drops dramatically, forcing the blower motor to work harder and consume significantly more electricity. By staying on top of your routine maintenance schedule and choosing high-quality replacement parts, you can easily ensure your device continues to deliver fresh, odor-free air year-round. Let us explore the primary types of filters used in modern systems and how they contribute to keeping your home sanctuary safe and comfortable.
Selecting the Correct Winix Filter Type for Your Model
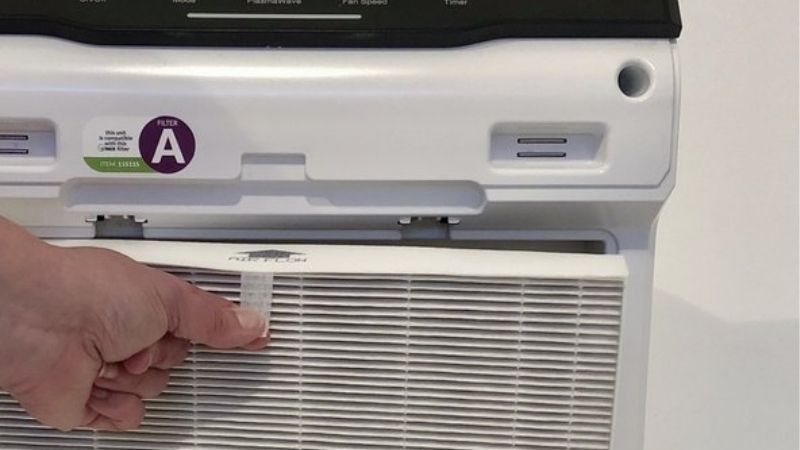
Before purchasing any replacement parts online, it is essential to identify the exact model number of your air purifier, which is typically printed on a white sticker on the back or bottom of the unit. Winix utilizes several distinct filter packages, often designated by letters such as Filter A, Filter H, or Filter O, each designed with specific dimensions to fit different machine housings. For instance, the highly popular Winix 5500-2 uses a completely different filter set than the C535 or the AM90 models, meaning a generic, one-size-fits-all approach will not work.
Choosing a package that matches your specific model guarantees a tight, seamless seal inside the filter chamber, which is crucial for preventing unfiltered air from bypassing the media. Many of these comprehensive replacement packages are conveniently sold on Amazon, allowing you to quickly find the exact match for your unit. Taking a few seconds to double-check your model number before ordering will save you the frustration of dealing with return shipping and keep your clean air routine completely uninterrupted.
The Crucial Role of True HEPA in Clean Air Filtration
The absolute heart of your air cleaning system is the True HEPA filter, which is responsible for trapping the vast majority of microscopic airborne particles. Certified True HEPA media is scientifically proven to capture up to 99.97% of particles as tiny as 0.3 microns, which includes dangerous mold spores, combustion smoke, pet allergens, and ultra-fine dust. Without a clean, high-grade HEPA layer, these microscopic irritants would simply blow right back out into your living space, triggering allergy symptoms and asthma attacks.
Because these specialized fibers are incredibly delicate, they cannot be washed, vacuumed, or scrubbed without permanently damaging the microscopic web that traps pollutants. Over time, the build-up of dust on the HEPA surface acts as a restrictive wall, which is why a complete replacement is the only way to restore your machine’s original purifying performance. For the ultimate peace of mind, we always suggest upgrading to a certified HEPA pack, which you can easily browse on Amazon to find current deals.
Understanding the Lifespan of Your Replacement Filters
While many air purifiers feature a handy indicator light that alerts you when it is time for a change, understanding the typical lifespan of each layer helps you plan ahead. Generally, a high-quality True HEPA filter is designed to last anywhere from twelve months of daily use, depending on the air quality inside your home. The thin carbon pre-filter sheets, which are responsible for absorbing stubborn odors and trapping larger hair balls, typically need to be swapped out every three months.
If you live in a household with multiple shedding pets, frequent indoor cooking, or high outdoor pollen levels, you will likely need to replace your filters much faster than someone living in a pet-free apartment. Routinely inspecting the physical condition of your filters every few weeks is an excellent habit, allowing you to spot premature clogging before it strains your machine. To ensure you always have fresh replacements on hand when that warning light inevitably turns red, we highly recommend keeping a backup set in your closet.
Preparation and What You Will Need for the Filter Change
Proper preparation is the key to executing a clean, fast, and successful filter swap without releasing trapped dust back into your pristine living environment. Before you begin opening up your machine, it is highly beneficial to gather a few basic cleaning tools and set up a dedicated workspace. Taking these simple preparatory steps ensures that you can thoroughly clean the internal chambers of the unit, maximizing the efficiency and overall lifespan of your brand-new filters. By treating this routine maintenance task as a complete system tune-up, you will protect your mechanical investment and enjoy noticeably fresher air the moment you turn the device back on. Let us walk through the essential tools and safety measures required to complete this quick process.
Essential Tools Required for a Quick Replacement Process
To complete your filter swap efficiently, you only need a few common household items alongside your fresh replacement filters. First, grab a high-quality microfiber cleaning cloth to wipe away any loose dust that has accumulated inside the plastic housing over the past several months. We highly recommend using a soft, non-abrasive microfiber towel, which you can easily find on Amazon, to prevent scratching the sleek, glossy plastic finish of your device.
Additionally, a household vacuum cleaner equipped with a soft brush attachment is incredibly useful for clearing out the heavy dust buildup on the permanent plastic pre-filter and intake grilles. Finally, you will need a fresh, high-quality replacement kit that includes both the thick True HEPA block and the thin activated carbon sheets. To secure the absolute best performance and a guaranteed fit, check out the top-rated replacement packs available on Amazon today.
Safety Precautions Before Opening Your Air Purifier Unit
Safety should always be your top priority when performing any type of maintenance on an electrical home appliance. Before touching any latches or attempting to remove the front cover, make sure to completely power down the device using the control panel and pull the power plug out of the wall outlet. This simple step entirely eliminates the risk of accidental electric shock and ensures that the internal blower fan cannot spin while your hands are inside the machine.
Furthermore, because dirty filters are packed with concentrated allergens, dust mites, mold spores, and pet dander, individuals with severe respiratory sensitivities should take extra care. Wearing a standard protective face mask and a pair of disposable gloves during the replacement process is a highly recommended practice to avoid inhaling or touching these irritating particles. Taking these basic, professional precautions ensures that your maintenance routine remains a completely safe and healthy experience from start to finish.
Preparing Your Workspace for a Mess-Free Filter Disposal
Because older, dirty filters hold a massive amount of loose, powdery dust, they can easily create a messy cloud of debris if handled roughly. To keep your floors clean, we suggest setting up your workspace on a hard, easy-to-wipe surface, such as a tile kitchen floor or a utility table, rather than on a plush carpet. Laying down a clean plastic trash bag or a sheet of old newspaper beneath the air purifier provides an excellent protective barrier that catches any falling particles.
Keep a large, heavy-duty trash bag open and within arm’s reach before you begin sliding the old filters out of their housing slots. This allows you to immediately deposit the dirty, dusty components directly into the bag without carrying them across the room, preventing allergens from redistributing into your home. Once the old filters are safely sealed inside the trash bag, you can proceed with cleaning the inside of the machine with total peace of mind.
Step-by-Step Instructions to Replace Your Winix Filter Properly
Now that your tools are gathered, your workspace is prepared, and your machine is safely unplugged, you are ready to begin the actual replacement process. Following a structured, step-by-step approach ensures that each component is handled with care and installed in the exact sequence required for optimal aerodynamic performance. This simple, intuitive process takes less than ten minutes to complete, yet it pays massive dividends in the form of quiet operation and pristine air quality. By carefully cleaning the internal sensors and grilles as you go, you will restore your device to its original factory efficiency. Let us dive into the precise, easy-to-follow steps to complete your maintenance project successfully.
The Step-by-Step Guide to Removing and Inserting the Filters
- Step 1: Open the Front Panel. Locate the small, recessed tabs on the left and right sides of your purifier’s front cover. Gently pull these tabs outward and lift the plastic panel upward to release it from the main body, exposing the internal filter chamber.
- Step 2: Clean the Permanent Pre-Filter. Carefully unclip the thin, plastic mesh pre-filter, which is designed to capture large pet hair and lint. Take this mesh to your sink, wash it thoroughly with warm water, and set it aside to dry completely, or use a vacuum brush to clear it.
- Step 3: Extract and Discard the Old Filters. Slide the dirty activated carbon sheet and the thick, dust-laden True HEPA filter out of their slots. Place them immediately into your prepared trash bag, seal it tightly, and take it directly to your outdoor garbage can.
- Step 4: Clean the Filter Chamber. Use your damp microfiber cloth to thoroughly wipe down the dusty plastic walls inside the chamber. Be sure to clear any cobwebs or loose dust bunnies from the lower intake vents to ensure completely unobstructed airflow.
- Step 5: Install the New HEPA Filter. Slide the fresh True HEPA filter into the back of the chamber first, making sure that the small directional arrows printed on the frame point inward toward the fan motor, guaranteeing proper airflow dynamics.
- Step 6: Place the Carbon Filter and Pre-Filter. Next, press the black activated carbon sheet into the front of the HEPA block, securing it flatly. Finish by clipping the clean, completely dry plastic mesh pre-filter back into place over the carbon layer.
- Step 7: Reattach the Front Panel and Reset. Hook the front plastic cover back onto the bottom tabs of the purifier, push the top edge until it clicks shut, plug the machine in, and hold the reset button for five seconds to clear the alert light.
Pro Tips & Mistakes to Avoid During Your Filter Installation
One of the most common mistakes homeowners make during this process is forgetting to remove the thin, clear plastic wrapping that protects new filters during transit. Installing a wrapped filter completely blocks all airflow, which can quickly cause the motor to overheat, create loud buzzing noises, and potentially burn out the entire system. Always take a close look at your new components and ensure all protective plastic film is fully removed before placing them inside the chamber.
Another vital tip is to never ignore the filter indicator reset button on the control panel, as the machine does not have a physical sensor that automatically knows when a new filter is installed. If you do not manually reset the system, the red warning light will remain on, and the internal timer will not track the lifespan of your fresh filters accurately. Use a small paperclip or a pin to gently press and hold the tiny “Reset” button for five seconds until you hear a clear beeping sound.
Pros and Cons of OEM vs Third-Party Winix Filter Replacements
When shopping for your new filter sets, you will quickly notice that you have a choice between original equipment manufacturer (OEM) parts and aftermarket third-party alternatives. OEM filters are built to incredibly strict quality control standards, guaranteeing a perfect, airtight fit and certified HEPA filtration efficiency that keeps your original manufacturer’s warranty completely intact. On the negative side, authentic OEM filters can be relatively expensive, often costing around $45 to $55 per set, which can add up over time.
Conversely, third-party replacement kits offer an incredibly budget-friendly option, with many sellers on Amazon offering convenient bulk multi-packs for under $25. While these generic options provide excellent cost savings, some buyers note in critical reviews that slight dimensional variations can occasionally lead to a loose fit, allowing unfiltered air to bypass the media. If you choose to go the aftermarket route, always purchase from highly rated brands on Amazon with a proven track record of positive consumer feedback.
Conclusion: Maintain Pristine Air with Regular Filter Changes
Ultimately, maintaining a clean and healthy home environment requires a consistent commitment to regular filter maintenance and system care. If you are ready to upgrade your indoor air quality and restore your machine to its original whisper-quiet efficiency, we highly recommend exploring the wide selection of top-rated replacement filters on Amazon today. With convenient multi-packs and fast shipping options available, finding the perfect match for your home is incredibly simple. Take a look at the best deals online and make your purchase today!
Top picks from this guide
 LHHXX33Dryer Vent Hose - 4 inch Flexible Duct, 8ft Long,…$9 \xc2\xb7 98/100Whirlpool 4396006RW Genuine OEM Dryer Vent Elbow Connector, 90-Degree Close-Turn,…$8 \xc2\xb7 98/100
 XANGNIERXANGNIER 5 Pack Dryer Vent Cleaner Kit,Flexible Dryer Lint Brush…$10 \xc2\xb7 97/100
 SealegendSealegend 40 Feet Dryer Vent Cleaner Kit/Lint Remover/Upgraded Flexible Quick-Snap…$27 \xc2\xb7 96/100


Write Your Review
No reviews yet. Be the first to share your experience!