
- Top Pick: No. 7 Mastic® Premium Air Duct Sealing Kit Grey
- Best Value: 10 Pack White Seal Putty, Waterproof Duct Sealant Clay, Moldable Repair Sealing Mastic for Drain, Wall & AC Pipe Holes Repair, Air & Water Leak Prevention,Duct Seal,Plumbers Putty,Easy to Use
- Premium Choice: Speedi-Products AC-DMS T Water Base Duct Mastic Sealant Tube 10.3 ounces
Leaky air ducts quietly waste 20 to 30 percent of the air your HVAC system moves, driving up bills and leaving some rooms stuffy while others never warm up. Sealing those leaks with duct mastic and UL-listed foil tape is one of the highest-return DIY projects a homeowner can tackle in a weekend.
This guide covers how to find duct leaks, choose between mastic and foil tape, and apply both correctly for an airtight, long-lasting seal, using proper duct sealants rather than the cloth-backed duct tape that fails within a year or two.
As an Amazon Associate we earn from qualifying purchases at no extra cost to you.




⚡ Save on Your Next PC — Amazon Prime
Prime members get fast free shipping on the systems above, plus early access to Prime Day & Black Friday PC deals. New members get a 30-day free trial.
Watch: DIY Guide: Sealing Leaky Air Ducts with Mastic Sealant and Foil Tape — Video Review
Find the Leaks
Run your HVAC system and feel along duct joints, seams, and connections for escaping air, paying special attention to the areas near the furnace and where ducts branch. Accessible ducts in the attic, basement, or crawlspace are where most fixable leaks hide. Mark each leak with tape so you can find it again.
Choose Mastic or Foil Tape
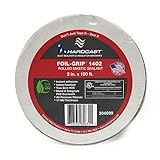
Use UL-listed foil tape like a Hardcast Foil-Grip mastic tape for small gaps and straight seams, and brush-on duct mastic such as a No. 7 Mastic Air Duct Sealing Kit for larger gaps, irregular joints, and any seam wider than about a quarter inch. Never use standard cloth duct tape; it dries out and peels.
Prepare the Surfaces
Wipe down each joint to remove dust and grease so the sealant bonds properly. Cold, dirty, or damp metal will not hold mastic or tape well, so clean and dry the area first. For very large gaps, bridge them with mesh tape before applying mastic.
Apply the Sealant
Brush mastic generously over the joint about an eighth of an inch thick, pressing it into every seam and gap, and embed mesh tape into larger openings for reinforcement. For foil tape, burnish it down firmly with a plastic squeegee so it bonds fully with no wrinkles or lifted edges.
Let It Cure and Test
Allow the mastic to cure fully, typically 24 to 48 hours, before relying on the seal. Then run your system again and re-check the sealed joints to confirm the leaks are gone and airflow to problem rooms has improved.
Tips
- Wear gloves; brush-on mastic is sticky and stubborn to remove from skin
- Only use UL 181-listed foil tape, never cloth-backed duct tape, which fails within a year
- Embed mesh tape into any gap wider than a quarter inch before applying mastic
- Seal the return-side ducts too, as leaks there pull in dusty attic or crawlspace air
Frequently Asked Questions
Is duct mastic better than foil tape?
For most leaks, yes. Mastic bonds into irregular joints and seals wider gaps permanently, while UL-listed foil tape works well for small, straight seams. Many jobs use both together.
Can I use regular duct tape to seal ducts?
No. Despite the name, standard cloth duct tape dries out and fails within a year or two. Use brush-on mastic or UL 181-listed foil tape for a lasting seal.
How much can sealing ducts save me?
Sealing leaks can recover the 20 to 30 percent of conditioned air that typically escapes, meaningfully lowering heating and cooling bills and improving comfort in previously stuffy rooms.
How long does duct mastic take to cure?
Most duct mastics cure within 24 to 48 hours. Wait for a full cure before running the system hard so the seal sets properly around the joint.
Conclusion
Sealing leaky ducts with mastic and foil tape is a low-cost, high-impact weekend project that pays back quickly in lower bills and better comfort. Skip the cloth duct tape, brush mastic into every gap, and enjoy an HVAC system that finally delivers air where you want it.






Write Your Review
No reviews yet. Be the first to share your experience!