Shark vacuum replacement filters are the ultimate solution to restore your home vacuum cleaner back to peak performance. Over months of heavy use, thick dust blocks the airflow, dropping your cleaning power. Fortunately, our complete step-by-step guide will walk you through the entire maintenance process to save your clean household machine today!
Understanding the Science of Shark Vacuum Replacement Filters
Operating a household vacuum cleaner without maintaining its internal filtration barriers is a primary cause of premature mechanical failure. Inside your high-performance cleaning machine, a complex aerodynamic system relies on a continuous, high-speed stream of air to lift heavy dirt and fine debris off your carpets. When this airflow path is obstructed by layers of packed-on dust, the entire physical mechanism struggles, leading to poor pick-up rates and potential motor damage. Understanding how these mechanical components function together helps you keep your home clean and your appliance running smoothly for years to come.
How Clogged Filtration Systems Reduce Your Overall Clean Air Quality
The primary purpose of vacuum filtration is not just to protect the internal electric fan motor, but also to prevent microscopic dust from blowing back out. When your vacuum pulls in dusty room air, it must separate the dirt particles from the air stream before releasing the processed exhaust back into your living space. If the internal foam or HEPA layers become saturated with pet dander, pollen, and microscopic mold spores, they lose their electrical and mechanical trapping capabilities.
As a result, your vacuum begins to leak fine particulate matter back into the air, creating a dusty haze and triggering uncomfortable allergy symptoms. This recirculation of allergens can cause sneezing, irritated eyes, and poor indoor air quality, turning a routine cleaning chore into a respiratory hazard. Regularly upgrading your filtration components ensures that your home air remains perfectly clean, fresh, and free of floating dust particles.
The Technical Anatomy of HEPA and Foam Filtration Barriers
Your advanced cleaning appliance utilizes a multi-tiered filtration strategy to trap debris of various physical dimensions before it can exit the exhaust port. The first line of physical defense is the pre-motor foam and felt assembly, which catches the medium-sized dust particles, human hair, and loose carpet fibers. This foam layer is highly porous, allowing air to pass through while physically blocking large contaminants from reaching the delicate fan blades.
Directly following the foam is a dense, non-woven felt filter that captures the finer sediment and powdery dust that escapes the initial barrier. Finally, the air passes through a medical-grade H13 HEPA filter, which is designed to capture up to 99.97% of microscopic allergens as small as 0.3 microns. This highly sophisticated multi-layered layout ensures that even invisible pollutants are permanently locked away, preventing them from contaminating your home.
The Pros and Cons of Upgrading to New Shark Vacuum Replacement Filters
Investing in a set of fresh shark vacuum replacement filters offers immense benefits by immediately restoring the powerful, deep-cleaning suction of your original machine. Fresh filtration elements allow the internal motor to run significantly cooler, reducing electrical power draw and preventing expensive thermal overload shutdowns during extended cleaning sessions. They also eliminate the sour, musty odors that often escape from older, dirty vacuums, leaving your home smelling clean and fresh after every cleaning session.
However, there are a few minor limitations associated with purchasing aftermarket filtration components that you must keep in mind during your maintenance routine. Some cheap, unbranded replacement kits may lack the precise physical dimensions required for an airtight seal, allowing dirty air to bypass the filtration system entirely. Additionally, keeping track of the specific model numbers for your vacuum can be slightly confusing due to the wide variety of models available. To avoid these issues, always choose high-quality, certified replica kits that match your vacuum model perfectly.
What You Will Need Before Installing Shark Vacuum Replacement Filters
Before you begin the physical process of dismantling your vacuum cleaner to swap out the dirty parts, gathering the proper supplies is essential. Trying to complete this maintenance task without the correct protective gear or cleaning brushes will only result in a messy workspace and a dusty room. Taking a few minutes to prepare your dedicated cleaning area beforehand ensures that the entire procedure is clean, efficient, and completely stress-free.
Selecting High-Quality Foam and Felt Filter Material Sets
To achieve the best results, you must select high-density foam and non-shedding felt materials that match the original equipment specifications. Lower-quality foam filters often crumble after a few washings, while thin felt layers can tear easily, allowing dangerous debris to pass through. You should prioritize buying premium, high-density replacement packages that include both the pre-motor and post-motor filtration elements to ensure complete coverage.
Using high-quality replacement parts is crucial to maintain structural seals and ensure that your vacuum operates at its intended efficiency. To make your shopping experience hassle-free, you can easily check out the best-selling [Shark Vacuum Replacement Filters Multi-Packs on Amazon] to find a highly rated set that matches your model. Having a spare set of filters on hand in your home closet allows you to swap them out instantly whenever the current set is drying.
The Best Tools for Clearing Trapped Debris and Dust Clusters
A dirty filter chamber often accumulates a thick layer of fine, static-charged dust that clings to the internal plastic walls and seals. Simply dropping a new filter into a dusty chamber will cause the fresh media to clog prematurely, reducing its overall lifespan. You should use a soft-bristled utility brush or a specialized micro-detailed vacuum attachment to thoroughly clean the inside of the housing before installing the new filters.
Wiping down the rubber gaskets with a clean microfiber towel is also highly recommended to ensure a tight, leak-free seal. To make this cleaning process much faster, we suggest using a dedicated cleaning accessory such as [HVAC and Vacuum Cleaning Detail Brushes on Amazon] to sweep away loose dirt easily. This simple cleaning step prevents dirty air from escaping through the edges of the filter chamber during operation.
Safety Gear and Workspace Preparations for Maintenance Work
Blasting or shaking dust out of dirty filters releases a highly concentrated cloud of microscopic allergens and fine particles into the air. Breathing in these airborne particles can trigger severe asthma attacks or sinus irritation, while loose debris can easily fly into your eyes. We strongly advise wearing a lightweight face mask and a pair of protective glasses to keep yourself safe and comfortable throughout the cleaning process.
Working in a well-ventilated outdoor area, such as a garage or backyard patio, is the best way to prevent dust from settling back onto your clean home furniture. To keep your work surface completely spotless and organized, consider investing in a durable, non-slip [Anti-Static Project Mat on Amazon] to hold your loose screws and plastic panels securely. Having several damp paper towels nearby will also help you wipe up any accidental spills quickly.
Step-by-Step Instructions to Apply Shark Vacuum Replacement Filters
With all your safety gear, detailed brushes, and fresh replacement filters prepared, you are ready to begin the physical installation process. Working methodically through each step ensures that you achieve a professional-grade fit while protecting your appliance from accidental physical damage. Follow these simple steps to safely remove, wash, replace, and test your new filtration components to restore your machine back to peak performance.
Step 1 and Step 2: Safe Cartridge Removal and Initial Hose Rinse
1. Power down the vacuum completely and disconnect the electrical plug. Your personal safety is the single most important part of this entire maintenance procedure. Never attempt to open the filter compartments while the machine is connected to live electricity, as this poses a severe risk of electric shock or sudden motor activation. Once the power cable is safely unplugged, carry the vacuum cleaner to your prepared outdoor workspace or place it over a large trash bin.
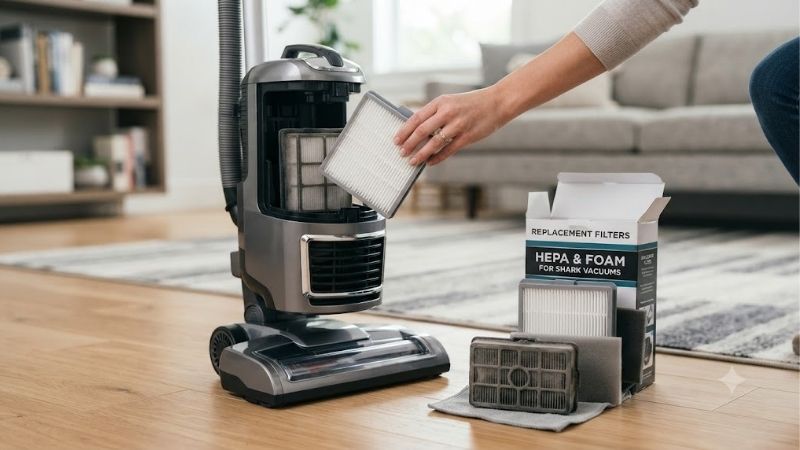
2. Locate and open the primary filter compartments. For most upright models, the pre-motor foam and felt filters are located directly beneath the dirt canister. Release the canister lock buttons, lift the dust bin away from the main body, and locate the small pull tab on the filter frame. Pull the tab gently to lift the dirty foam cylinder and the flat felt disc out of their plastic tray, making sure not to shake them.
3. Inspect the post-motor HEPA filter housing. The HEPA filter is typically located on the front of the vacuum, behind a removable plastic grille cover. Press the release tab on the grille, pull the cover forward, and slide the rectangular HEPA cartridge out of its track. Place the dirty filters directly into an empty plastic bag to prevent fine dust from blowing around your yard.
Step 3 and Step 4: Applying Chemical Cleaner and Deep Soaking
4. Perform a preliminary dry tap of the dirty elements. Hold the dirty foam and felt filters deep inside your trash can and tap them gently against the side walls. This will dislodge the loose, heavy surface dust and hair clumps, allowing water to penetrate the fibers much easier during the washing phase. Avoid tapping the HEPA filter, as its delicate paper pleats can easily tear or bend, ruining its filtration capabilities permanently.
5. Wash the foam and felt elements under running lukewarm water. Take the pre-motor foam and felt filters to a sink and rinse them thoroughly under a gentle stream of lukewarm water. Squeeze the foam gently with your hands to flush out the embedded dirt, but avoid twisting or wringing the material, as this can tear the foam. Continue rinsing until the runoff water transitions from a muddy brown to a perfectly clear stream.
6. Avoid using dish soaps, laundry detergents, or harsh chemical cleaners. These chemical agents can leave a sticky residue on the porous foam fibers, which will rapidly attract new dust and clog the filter faster during use. Do not attempt to wash the HEPA filter unless it is explicitly marked as washable by the manufacturer. Most HEPA filters must be replaced with fresh units, as water will ruin the delicate fiberglass web.
Step 5 and Step 6: Thorough Final Rinsing and Complete Drying Process
7. Allow the washed filtration components to air dry completely. Once the foam and felt filters are thoroughly rinsed, squeeze out any excess water gently with a dry microfiber towel. Place the damp elements in a warm, dry, shaded outdoor area with plenty of natural airflow, leaving them to dry for at least twenty-four hours. Never reinstall damp filters, as the moisture will draw dust into the motor, causing permanent electrical failure and mold growth.
8. Install your fresh shark vacuum replacement filters into the housing. Once the washed filters are bone-dry, or if you are using brand new replacements, slide them back into their respective slots. Place the flat felt disc down first, followed by the foam cylinder on top, ensuring that they sit flush within the plastic tray. Insert the HEPA cartridge back into the front track and press it firmly until you hear a secure click.
9. Reassemble the protective covers and test your vacuum’s suction power. Align the outer plastic grille covers and press them into place until the locking tabs snap shut. Reattach the clean dirt canister to the main body and verify that all seals are tight and airtight. Plug the power cord back into the wall outlet, turn the power switch on, and enjoy the refreshing, powerful suction of your newly restored cleaning machine.
Conclusion
Maintaining a clean and highly efficient home vacuum system is incredibly straightforward when you establish a regular maintenance routine and use quality parts. Regularly using quality shark vacuum replacement filters will save you money on utility bills, prevent expensive motor failures, and keep your indoor air fresh and allergen-free. Grab your professional maintenance supplies today, upgrade your filtration elements, and enjoy a cleaner, fresher, and more comfortable home environment all year round!
Top-Rated Picks


Filtrete 16x25x1 Air Filter MERV 5, 6-Pack AC Furnace HVAC, MPR 300 Basic Dust Defense, Pleated Electrostatic, Removes Lint


| Product | Brand | Rating | Reviews | Price |
|---|---|---|---|---|
| Filtrete 14x30x1 Air Filter MERV 5, 6-Pack AC Furnace… | — | ★ 4.7 | 160.2k | $27.96 |
| Filtrete 20x20x1 Air Filter MERV 5, 6-Pack AC Furnace… | — | ★ 4.7 | 160.1k | $39.99 |
| Filtrete 16x25x1 Air Filter MERV 5, 6-Pack AC Furnace… | — | ★ 4.7 | 160.1k | $27.96 |
| Filtrete 16x20x1 Air Filter MERV 5, 6-Pack AC Furnace… | — | ★ 4.7 | 159.6k | $33.84 |
| Filterbuy 16x30x1 Air Filter MERV 8 Essential Dust & … | Filterbuy | ★ 4.7 | 158k | $49.96 |


Write Your Review
No reviews yet. Be the first to share your experience!