Compressed air for pc cleaning is the absolute best way to protect your valuable gaming rig or office computer from dangerous thermal throttling. Over time, thick dust buildup suffocates sensitive fans and blocks crucial airflow paths. Fortunately, our step-by-step guide will walk you through the entire maintenance process to save your PC system!
Why Using Compressed Air for PC Cleaning is Absolutely Essential
Regular hardware maintenance is the cornerstone of keeping any desktop computer running at peak performance. Inside your PC case, cooling fans constantly pull in ambient air to keep high-performance components like the graphics card and processor cool. However, this continuous air circulation turns your system into a literal dust magnet over time. Let us explore how routine cleaning safeguards your investment and prevents permanent component wear.
How Dust Buildup Slowly Destroys Your Computer Performance
Dust acts as a highly efficient insulating blanket when it settles on your motherboard, RAM, and expansion cards. Instead of allowing heat to escape into the passing airflow, this microscopic layer of dirt traps thermal energy close to the silicon. As a result, your CPU and graphics card temperatures rapidly spike under moderate loads, forcing the system to slow down to prevent meltdown. This protective slowdown, known as thermal throttling, causes sudden frame drops in games, freezes heavy software programs, and triggers unexpected system crashes.
Furthermore, fine dust particles inevitably make their way into the physical bearings of your cooling fans. Once inside, the grit increases mechanical friction, causing your fans to spin much slower while producing annoying whining noises. This added resistance forces the fan motors to draw extra electrical current, which overheats their internal coils and leads to premature fan failure. Regularly clearing this dust ensures that components remain within their designed operating temperatures, keeping your desktop operating silently and reliably.
The Mechanism of Compressed Air for PC Cleaning Workflows
Standard liquid sprays and damp household cloths are far too dangerous to use on raw, exposed circuit boards. This is why utilizing specialized dry compressed air for pc cleaning is the gold standard, as it provides a powerful mechanical cleaning action without any physical contact. The pressurized dry gas produces a high-velocity stream that easily reaches deep inside dense aluminum fins, dislodging fine dust particles and forcing them out of the computer chassis.
Unlike standard vacuum cleaners that generate massive amounts of static electricity as air rushes through their plastic nozzles, compressed air contains no static charge. This non-contact delivery mechanism is completely safe for delicate surface-mount resistors, microscopic capacitors, and fragile solder joints. By utilizing controlled blasts of clean, dry gas, you can thoroughly clean the most complex areas of your motherboard without ever risking a catastrophic electrostatic discharge.
The Pros and Cons of Using Compressed Air on Electronics
Using specialized aerosol cans for electronics maintenance offers clear advantages when it comes to speed, accessibility, and overall safety. These convenient cans allow you to blast away tightly bound dust in seconds, requiring zero disassembly of complex cooling loops or graphics card shrouds. Because the gas leaves no conductive residue, it is the safest solution for beginners who want to maintain their hardware without voiding manufacturer warranties.
However, there are a few minor limitations associated with pressurized gas cans that you should keep in mind during your maintenance routine. As the liquefied gas inside the can expands and escapes, the can itself rapidly drops in temperature, which can lead to moisture condensation if sprayed continuously for too long. Additionally, holding the can at incorrect angles can cause liquid propellant to shoot out, which can freeze and crack delicate silicon parts. To avoid these issues, many users pair traditional cans with reusable electric dusters for heavy-duty cleaning projects.
What You Will Need to Prepare Before Dusting Your Computer
Before you begin opening your computer chassis, gathering the correct maintenance gear and setting up your workspace is critical. Attempting to clean sensitive electronic components with incorrect tools or in a dusty environment can result in accidental physical damage. Organizing your workspace with high-quality, static-safe supplies beforehand will make the entire process highly efficient and keep your hardware perfectly safe.
Selecting the Best Compressed Air for PC Cleaning Cans
When shopping for maintenance supplies, choosing high-quality aerosol cans designed specifically for electronic equipment is vital. Avoid cheap utility air cans, as they often contain moisture or oily chemical residues that can coat your circuit boards. You should look for specialized, moisture-free formula cans that feature a detachable extension straw to guide the high-pressure stream into narrow cracks.
For heavy-duty cleaning sessions, keeping a multi-pack of reliable aerosol dusters in your workshop guarantees you never run out of pressure midway through. These specialized canisters are engineered to deliver a consistent, powerful blast that is perfect for clearing out packed radiator fins. To ensure a smooth cleaning session, we highly recommend checking out a premium pack of [Compressed Air Cans on Amazon] before you begin disassembling your system.
Essential Anti-Static Brushes and Cleaning Cloth Supplies
While pressurized gas easily removes loose dust, some particles bind tightly to fan blades due to household humidity or kitchen grease. For these stubborn spots, a set of specialized anti-static brushes is incredibly useful for gently breaking the bond before spraying. Never use normal synthetic household paintbrushes, as their nylon bristles generate high levels of static electricity that can easily destroy microchips.
To safely wipe down the dusty flat surfaces of your computer case, you will also need high-quality cleaning cloths. Standard paper towels scratch glossy acrylic panels and leave behind paper fibers that can clog your fans. For a flawless finish, consider purchasing a dedicated set of static-safe brushes and cloths, such as a top-rated [Anti-Static Cleaning Brush Set on Amazon] to safely scrub fan blades.
Safety Gear and Workstation Preparation Essentials
Blasting high-pressure air into a dirty computer case releases a dense cloud of fine, concentrated dust into your workspace. Breathing in these airborne particles can trigger severe allergic reactions, while flying debris can easily cause eye irritation. Wearing a simple face mask and a pair of wrap-around protective glasses is highly recommended to keep yourself comfortable and safe throughout the process.
You will also need a clean, stable surface to work on, preferably covered with a static-dissipating mat to protect your hardware. Slipping your computer onto a soft, grounded surface prevents accidental scratches on your glass side panels and helps manage loose screws. To make your workspace professional and organized, consider investing in a durable, heat-resistant [Anti-Static Project Mat on Amazon] to protect your desk and keep small parts secure.
Step-by-Step Instructions to Apply Compressed Air Safely
With all your safety gear, anti-static brushes, and compressed air canisters prepared, you are ready to begin the physical cleaning process. Working methodically through each step ensures that you achieve a deep clean while protecting your delicate components from static and physical strain. Let us walk through the exact steps required to shut down, disassemble, clean, and test your system to restore perfect cooling performance.
Step 1 and Step 2: System Shutdown and Opening the Case
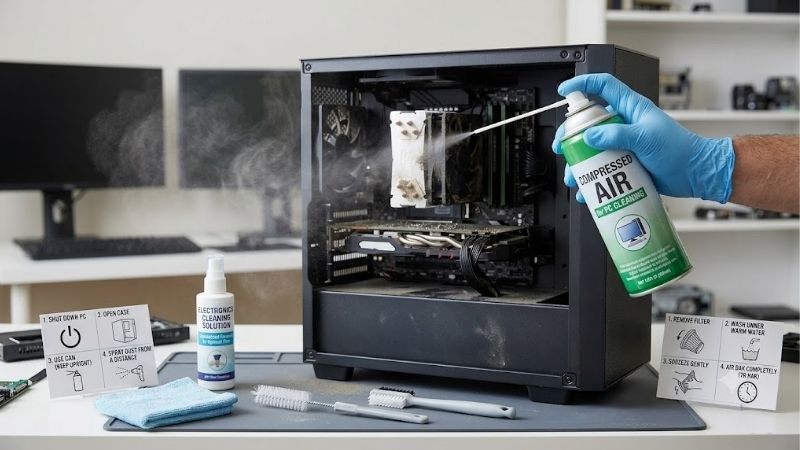
1. Power down the PC completely and disconnect all cables. Your safety and the protection of your hardware are the most important parts of this procedure. Shut down your operating system, flip the physical switch on the back of your power supply to the “off” position, and unplug the power cable from the wall. Press and hold the chassis power button for ten seconds to drain any leftover electrical charge stored inside the motherboard capacitors.
2. Remove the side panels and move to a ventilated area. Use your screwdriver to carefully back out the metal screws securing the glass or metal side panels and store them safely. Because of the large dust cloud you are about to create, carry the open PC chassis outdoors to a patio, garage, or open balcony. This prevents the dislodged dust from settling back onto your carpets, furniture, or keyboard.
Step 3 and Step 4: Fan Stabilization and Dusting Techniques
3. Secure all cooling fans to prevent them from spinning. Never allow high-pressure air to spin your fans freely during the dusting process. The force of compressed air can spin fan blades far beyond their rated speed, which instantly ruins the delicate internal bearings. Hold the center of the fan blade still with your finger, or place a clean wooden toothpick between the blades to lock them in place before spraying.
4. Spray the air in short, controlled, upright bursts. Hold your aerosol can completely upright at a distance of about six inches from the dusty components. Never shake the can during use or tilt it sideways, as this causes the freezing liquid propellant to spray out onto your hardware. Direct the extension straw towards the dirty surfaces and pull the trigger in rapid, one-second bursts to keep the can from dropping in pressure.
Step 5 and Step 6: Detailed Component Cleaning and Reassembly
5. Blast dust out of heatsinks, ports, and power supplies. Focus the high-pressure stream on the thickest dust collectors, including the CPU cooler radiator, graphics card shroud, and motherboards. Blow through empty RAM slots and PCIe expansion channels to clear out any insulating dust layers. Make sure you spray the air in a direction that blows the dust completely out of the case, rather than pushing it deeper inside.
6. Wipe down surfaces, reassemble, and test your computer. Take your soft anti-static brush and gently sweep away any remaining dust clumps from the fan blades and case floor. Wipe the bottom of the chassis clean with a dry microfiber cloth before reinstalling the side panels. Finally, carry the clean PC back to your desk, reconnect your cables, flip the power supply switch back on, and enjoy silent, cool system performance.
Conclusion
Keeping your computer clean and dust-free is one of the most rewarding DIY tasks you can perform to boost system speed. Regularly utilizing compressed air for pc cleaning is the absolute best way to lower running temperatures, eliminate noisy fan whine, and protect your expensive hardware from heat damage. Do not let thick dust choke your processor or slow down your favorite games this season. Grab your professional maintenance supplies today, clear out that performance-robbing dirt, and enjoy a faster, quieter, and highly efficient computer system all year round!
Top-Rated Picks


Filtrete 16x25x1 Air Filter MERV 5, 6-Pack AC Furnace HVAC, MPR 300 Basic Dust Defense, Pleated Electrostatic, Removes Lint


| Product | Brand | Rating | Reviews | Price |
|---|---|---|---|---|
| Filtrete 14x30x1 Air Filter MERV 5, 6-Pack AC Furnace… | — | ★ 4.7 | 160.2k | $27.96 |
| Filtrete 20x20x1 Air Filter MERV 5, 6-Pack AC Furnace… | — | ★ 4.7 | 160.1k | $39.99 |
| Filtrete 16x25x1 Air Filter MERV 5, 6-Pack AC Furnace… | — | ★ 4.7 | 160.1k | $27.96 |
| Filtrete 16x20x1 Air Filter MERV 5, 6-Pack AC Furnace… | — | ★ 4.7 | 159.6k | $33.84 |
| Filterbuy 16x30x1 Air Filter MERV 8 Essential Dust & … | Filterbuy | ★ 4.7 | 158k | $49.96 |


Write Your Review
No reviews yet. Be the first to share your experience!