Airbrush cleaner is an absolute necessity if you want to keep your painting equipment operating flawlessly without annoying clogs or splatters. This comprehensive step-by-step guide walks you through the entire cleaning process, ensuring your tools stay in pristine condition. Discover the best practices to maintain your creative painting gear well.
Choosing the Right Airbrush Cleaner and Essential Tools for Maintenance
Maintaining a pristine airbrush is the single most important habit for any hobbyist, illustrator, or professional painter who relies on smooth color transitions and precise line work. Before you begin the physical cleaning process, understanding the unique chemical properties of your selected airbrush cleaner and assembling the necessary tools will save you from frustration and accidental equipment damage. Choosing the correct fluids ensures that pigment residues are completely dissolved without deteriorating the delicate internal rubber seals and metal components of your tool. Let us dive deep into the essential preparation steps, tool gathering, and product evaluations that will form the foundation of your regular maintenance routine.
Selecting Your Catchy Title for Airbrush Cleaner Content
When you are creating content or searching for the ultimate resources on this topic, having a clear, search-optimized title helps direct your learning journey. For bloggers and creators looking to share their experiences with a high-performance airbrush cleaner, selecting an engaging and optimized headline is crucial for reaching the right audience. A great title should instantly promise a practical solution to common painting frustrations, such as stubborn clogs, uneven spray patterns, or dried acrylic pigments.
To help you structure your own notes or find the best resources online, here are three highly optimized, catchy titles designed to attract readers seeking expert advice:
- How to Clean an Airbrush: The Easy Way to Avoid Paint Clogs
- Step-by-Step Guide: How to Use Airbrush Cleaner for Perfect Flow
- The Easy Way to Clean Your Airbrush Fast: A Complete Guide
These titles are excellent because they target the exact pain points of artists—specifically, the dread of a clogged nozzle and the desire for a swift, painless cleanup. Whether you are a beginner picking up a spray gun for the first time or an experienced modeler, focusing on these simple, step-by-step methodologies ensures your equipment remains highly reliable.
What You Will Need: Essential Gear for Flawless Airbrush Cleaning
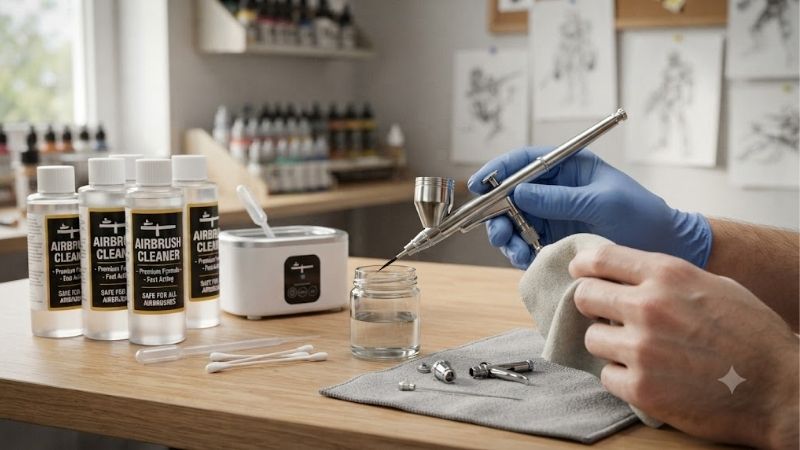
To execute a professional-grade cleanup, you must gather a specialized set of maintenance tools before opening your paint bottles. Having these items organized on your workstation prevents paint from drying inside the fluid passage while you search for supplies. Each of these tools serves a specific purpose in breaking down dried pigment and ensuring that no microscopic debris remains behind to ruin your next creative session.
Here is the ultimate list of essential supplies you should prepare, along with key performance features to look for when shopping:
- Premium Airbrush Cleaner: A dedicated commercial formula is highly recommended because it contains specialized surfactants that break down acrylics, enamels, and lacquers quickly. You should select a highly rated commercial bottle to avoid damaging the internal O-rings of your delicate tool.
- Cleaning Pot and Stand: This acts as a safe, enclosed receptacle to spray your waste fluids into, preventing chemical fumes and paint mist from escaping into your breathing zone.
- Nozzle Cleaning Needles and Brushes: Tiny, soft-bristled wire brushes are essential for scrubbing the interior paint channel, while a specialized gold nozzle needle helps scrape out stubborn, dried paint from the tip.
- Microfiber Cloths and Cotton Swabs: These lint-free materials allow you to wipe down the exterior of the needle and the interior of the paint cup without leaving behind tiny fibers that could clog the nozzle.
Using high-quality cleaning accessories prevents micro-scratches on the internal metal surfaces of your spray gun. Investing in a complete, dedicated maintenance kit ensures you always have the correct brush sizes and nozzle tools on hand. To find the highest-rated cleaning pots and specialized brush sets currently favored by professional modelers, we recommend checking out the top maintenance bundles available online today.
Commercial vs. DIY Airbrush Cleaner: Pros and Cons Analysis
Many artists wonder whether they should invest in a dedicated commercial airbrush cleaner or simply mix a homemade solution using household ingredients. Commercial formulas are scientifically engineered with specific solvents and lubricants that dissolve paint while actively preserving the structural integrity of the internal rubber O-rings. These commercial options are exceptionally reliable and eliminate the guesswork, making them the preferred choice for expensive, high-end airbrushes where component failure is costly.
However, the primary drawback of commercial solutions is their ongoing cost, especially for high-volume painters who go through bottles rapidly during large-scale projects. On the other hand, DIY mixtures using distilled water, isopropyl alcohol, and a few drops of glycerin are incredibly inexpensive and easy to make in bulk. The downside to homemade mixtures is that they can be overly aggressive if the alcohol concentration is too high, leading to dried-out, cracked rubber seals and potential corrosion of the chrome plating over time.
For most casual hobbyists and professional artists alike, keeping a bottle of premium commercial cleaner for deep cleanups and using a mild DIY flush between color changes represents the perfect compromise. This hybrid approach keeps your operational costs low while guaranteeing that your delicate internal components receive the absolute best chemical protection. To explore the most cost-effective bulk options for professional-grade cleaning fluids, take a look at the top-selling formulas on the market right now.
Step-by-Step Guide: How to Clean Your Airbrush Correctly
Once you have assembled your tools and selected your cleaning fluids, you are ready to begin the physical purification process. Cleaning your spray gun immediately after a painting session is the absolute best way to prevent dried-up pigment from locking up the needle mechanism. This detailed walkthrough covers the standard flushing procedure, complete disassembly, and the deep-scrubbing techniques required to keep your tool operating like new. By following these steps in order, you will establish a fast, efficient routine that takes less than five minutes at the end of every painting session.
Step 1 and Step 2: Preparing and Flushing with Airbrush Cleaner
To begin the cleaning process, you must first clear out any excess paint remaining in the gravity-feed cup. Pour any leftover paint back into its original bottle or discard it safely into a waste container, using a damp cotton swab to wipe out the thickest residue from the cup walls. Once the cup is relatively clear, pour a generous amount of specialized airbrush cleaner directly into the reservoir until it is about half full.
Next, turn on your air compressor and prepare to flush the system by spraying the cleaning fluid directly into your dedicated cleaning pot. As you spray, place a clean microfiber cloth or your gloved finger firmly over the needle cap to block the front nozzle completely. When you pull the trigger with the nozzle blocked, air is forced backward into the paint cup, creating a vigorous bubbling action that loosens dried paint from the fluid passages. Repeat this back-flushing technique two or three times until the fluid in the cup runs completely clear and colorless.
This initial flush removes the vast majority of wet pigment, making the subsequent disassembly steps significantly cleaner and easier to manage. It is a vital habit that prevents wet paint from being dragged backward into the air valve assembly when you pull the needle out. To secure a heavy-duty cleaning station that makes back-flushing neat and fume-free, consider browsing the top-rated cleaning pots available online.
Step 3 and Step 4: Disassembling and Deep Cleaning the Needle
While basic flushing is sufficient between color changes, a thorough deep clean requires you to disassemble the rear housing and extract the needle. Carefully unscrew the back handle of your airbrush to expose the needle chucking nut, then loosen the nut slightly so the needle can slide freely. Gently pull the needle straight out of the front of the body, taking extreme care not to bend or blunt the delicate, razor-sharp tip.
Once the needle is free, saturate a lint-free microfiber cloth with your airbrush cleaner and wrap it firmly around the metal shaft. Wipe the needle in a single direction—always moving from the blunt rear end toward the sharp tip—to avoid piercing your fingers or bending the delicate point. Inspect the needle closely under a bright light to ensure there are no microscopic rings of dried acrylic paint clinging to the metal.
If you notice any stubborn residue near the tip, use a cotton swab soaked in a stronger solvent to dissolve the remaining pigment. Keeping the needle perfectly smooth is essential for maintaining an airtight seal and achieving ultra-fine detail lines during your painting projects. To find high-quality, ultra-fine cleaning swabs that do not shed fibers inside your equipment, check out the specialized detailing tools recommended by top artists.
Step 5 and Step 6: Detailing the Nozzle and Reassembling the Airbrush
With the needle removed, you can now focus on the tiny nozzle assembly at the very front of the airbrush body. Use the specialized wrench provided with your kit to carefully unscrew the nozzle cap and the nozzle itself, keeping in mind that these brass parts are incredibly fragile. Soak the nozzle in a small cap filled with airbrush cleaner for a few minutes to soften any deep-seated clogs hiding inside the micro-passage.
After soaking, take an ultra-fine cleaning brush and gently insert it into the rear of the nozzle, twisting it smoothly to sweep out dissolved paint particles. Once the interior is clean, carefully thread the nozzle back onto the airbrush body, ensuring you do not overtighten and strip the delicate brass threads. Slide the clean needle back through the rear of the body until it seats firmly in the nozzle, tighten the chucking nut, and screw the rear handle back on.
To verify that your reassembly was completely successful, pour a few drops of clean water into the cup and spray it onto a piece of cardboard. The spray pattern should be perfectly symmetrical and atomized, with absolutely no bubbling in the cup or sputtering at the tip. For those looking to upgrade their cleaning kit with precision nozzle wrenches and micro-cleaning brushes, exploring the professional toolsets available online is highly recommended.
Expert Pro Tips and Critical Mistakes to Avoid with Your Airbrush Cleaner
Even with a detailed step-by-step guide, mastering the art of airbrush maintenance involves learning the subtle nuances of fluid dynamics and material care. Experienced artists know that minor adjustments to your daily routine can double the lifespan of your equipment and prevent costly replacement purchases. This section outlines advanced advice from seasoned professionals, highlighting critical mistakes that can ruin your spray gun and offering tips on how to optimize your cleaning schedule. By adopting these expert habits, you will enjoy a seamless, clog-free painting experience every single time you pick up your tool.
Pro Tips for Optimizing Your Daily Airbrush Cleaner Routine
One of the most effective professional secrets is to never let your airbrush sit empty on its stand with wet paint inside, even for a few minutes. If you need to step away from your desk, simply fill the paint cup with a few drops of water or mild airbrush cleaner to keep the pigment wet. This simple preventative habit prevents the acrylic binder from polymerizing inside the nozzle, saving you from a tedious deep-cleaning session later.
Another brilliant tip is to apply a tiny drop of specialized airbrush lubricant to the exposed needle shaft before reassembling the unit. This high-grade synthetic lubricant helps the needle glide smoothly through the packing seal, preventing paint from sticking to the needle during long, high-detail spraying sessions. It also ensures that the trigger action remains incredibly responsive, giving you maximum control over your paint flow.
Additionally, always spray a final cup of clean water through your system after using a chemical cleaner to remove any remaining solvent residue. This prevents any leftover chemical compounds from mixing with and altering the consistency of your fresh paint during your next creative session. To find premium, wax-free lubricants designed specifically for delicate airbrush valves, take a look at the top-rated maintenance accessories online.
Fatal Mistakes to Avoid That Damage Your Airbrush Needle and Nozzle
The most common and costly mistake beginners make is using cheap metal wire or sewing needles to clear stubborn clogs from the delicate brass nozzle. The opening of an airbrush nozzle is machined to incredibly tight tolerances, and inserting hard metal tools will stretch or split the brass instantly. Once a nozzle is split, the airbrush will suffer from chronic sputtering, uneven spray patterns, and constant paint pooling, requiring a brand-new replacement nozzle.
Another major mistake is soaking the entire airbrush body overnight in harsh industrial solvents like acetone or lacquer thinner. While these chemicals are highly effective at dissolving paint, they will quickly destroy the rubber O-rings and Teflon packing seals inside the air chamber. Once these internal seals disintegrate, air will leak into the paint passage, causing uncontrollable bubbling in the cup and a complete loss of atomization.
Lastly, never pull the needle out through the rear of the airbrush if there is a large glob of dried paint clinging to the tip. Doing so will drag the hard paint residue directly through the internal Teflon packing seal, scratching the seal and causing permanent paint leaks into the trigger mechanism. Always clean the needle tip thoroughly from the front before attempting to pull it backward out of the body.
Establishing a Long-Term Airbrush Cleaner Maintenance Schedule
To keep your equipment operating at peak performance, you should categorize your cleaning routines into daily, weekly, and monthly tasks. Your daily routine should consist of a basic flush and a quick needle wipe-down at the end of every single painting session, which takes less than two minutes. This simple daily habit prevents major clogs from ever forming, keeping your workflow incredibly smooth and productive.
Once a week, or after intensive projects, you should perform a partial disassembly, removing the needle, nozzle cap, and needle cap for a deep scrub. Soak these front-end parts in a dedicated airbrush cleaner to dissolve any hidden build-up that your daily flushes missed. This weekly maintenance ensures that your spray gun maintains its ultra-fine detail capabilities and prevents minor clogs from escalating into serious mechanical issues.
On a monthly basis, perform a complete teardown of the entire airbrush, including the trigger assembly, air valve, and internal packing seals. Clean every component thoroughly, inspect the rubber O-rings for signs of wear or cracking, and apply fresh lubricant to all moving metal parts. By maintaining this structured, proactive schedule, your favorite airbrush will continue to deliver flawless, professional-grade results for many years to come.
Conclusion
In conclusion, mastering the proper use of an airbrush cleaner is the single most valuable skill you can develop to protect your creative investments and elevate your painting quality. By understanding your cleaning tools, executing a disciplined step-by-step disassembly, and avoiding common maintenance pitfalls, you ensure your equipment always sprays beautifully. Do not wait for a ruined spray gun or a ruined paint job to start taking proper care of your valuable tools. Click here to check the current pricing and secure a premium, highly effective airbrush cleaner to keep your creative setup running flawlessly today!
Top-Rated Picks


Filtrete 16x25x1 Air Filter MERV 5, 6-Pack AC Furnace HVAC, MPR 300 Basic Dust Defense, Pleated Electrostatic, Removes Lint


| Product | Brand | Rating | Reviews | Price |
|---|---|---|---|---|
| Filtrete 14x30x1 Air Filter MERV 5, 6-Pack AC Furnace… | — | ★ 4.7 | 160.2k | $27.96 |
| Filtrete 20x20x1 Air Filter MERV 5, 6-Pack AC Furnace… | — | ★ 4.7 | 160.1k | $39.99 |
| Filtrete 16x25x1 Air Filter MERV 5, 6-Pack AC Furnace… | — | ★ 4.7 | 160.1k | $27.96 |
| Filtrete 16x20x1 Air Filter MERV 5, 6-Pack AC Furnace… | — | ★ 4.7 | 159.6k | $33.84 |
| Filterbuy 16x30x1 Air Filter MERV 8 Essential Dust & … | Filterbuy | ★ 4.7 | 158k | $49.96 |


Write Your Review
No reviews yet. Be the first to share your experience!