Clean vacuum filter steps are often ignored by homeowners until their machine completely loses suction. However, keeping this component spotless is absolutely vital for household air quality. Our simple guide will show you how to handle this chore without any hassle, ensuring your home remains dust-free and your vacuum runs like a perfect new unit.
Understanding the Importance of Clean Vacuum Filter Maintenance
Every time you power on your favorite household vacuum cleaner, the internal motor pulls in massive volumes of dust, pet hair, dander, and microscopic pollen from your floors. This debris is immediately directed toward the filtration system, which acts as a protective barrier to prevent these irritating particles from being blown back into your living spaces. Over a short period of continuous use, these trapped particles form a thick, impenetrable wall of dust that restricts the natural passage of air. Establishing a regular routine to inspect and clean vacuum filter elements is not just about keeping the machine clean; it is the fundamental key to maintaining a healthy, dust-free home environment.
Restoring Strong Suction and Engine Efficiency
When a filtration system becomes heavily clogged with fine dust, your vacuum motor has to work twice as hard to draw in air from the floor nozzle. This extra strain not only reduces your cleaning efficiency but also causes the internal electrical components to overheat rapidly, which can trigger the automatic safety shutoff mechanism. By taking the time to wash your filters, you instantly clear this air blockage, allowing the motor to run at its optimal temperature and restoring that satisfying, deep-cleaning suction power you need for thick carpets.
Furthermore, a clean airflow means you do not have to make multiple tedious passes over the same patch of carpet to pick up stubborn debris, which saves you both time and physical effort during your weekly chores. Keeping the airflow unrestricted ensures that your vacuum works exactly as the manufacturer intended, preserving its cleaning integrity across all types of flooring. It is the easiest way to make a budget-friendly vacuum perform like an incredibly expensive premium model.
Protecting Your Indoor Air Quality and Respiratory Health
Modern vacuum cleaners are highly praised for their ability to capture invisible allergens, but they can only do this job effectively if the filtration path is completely clear. When you operate a machine with a dirty or damaged filter, the high-pressure exhaust air can actually force tiny dust mites, mold spores, and fine dander back into your breathing zone. This recycled dust can quickly trigger allergy symptoms, cause itchy eyes, and irritate the lungs of sensitive family members who suffer from chronic asthma.
Regularly sanitizing these filters guarantees that the microscopic particles remain trapped inside the vacuum container rather than floating freely through your living room air. This simple habit keeps your home smelling incredibly clean and prevents that classic, dusty “vacuum smell” from filling your bedrooms after every cleaning session. Protecting your family’s respiratory health is by far the most valuable benefit of maintaining your appliance’s filtration system.
Extending the Lifespan of Your Expensive Vacuum Investment
A high-quality vacuum cleaner is a significant financial investment, with many top-rated models costing anywhere from $200 to $600 on the market today. The absolute number one cause of premature motor failure in these machines is the persistent overheating caused by clogged filters that choke off the cooling air supply. When the motor consistently runs hot, the internal plastic bearings melt, the copper windings burn out, and the entire unit becomes completely unusable.
Replacing a burned-out motor is often so expensive that it is more practical to discard the entire machine and buy a brand-new one, which is an incredibly frustrating waste of money. By dedicating just a few minutes every month to checking your filters, you can easily double the operating lifespan of your vacuum cleaner. This basic preventative maintenance preserves your household budget and ensures your cleaning equipment remains highly reliable for many years to come.
Step-by-Step Instructions on How to Clean Vacuum Filter Elements
Washing your vacuum filters is a straightforward, mess-free task that does not require any specialized technical background or expensive commercial cleaning solutions. Most modern vacuums utilize simple, washable foam and felt components that can be restored to like-new condition using nothing more than cool, running tap water. Let us explore the exact tools you need to gather and the precise physical steps required to wash and dry these essential components without causing any damage.
Gathering Your Essential Cleaning Supplies and Tools
Before you begin dismantling your vacuum cleaner, it is best to set up a dedicated workspace near a large utility sink or an outdoor wash basin. Having all your supplies ready beforehand prevents you from tracking fine grey dust across your newly cleaned countertops or bathroom tiles. You will only need a few basic household items that are gentle on synthetic filter fibers yet highly effective at lifting out stubborn, embedded dirt.
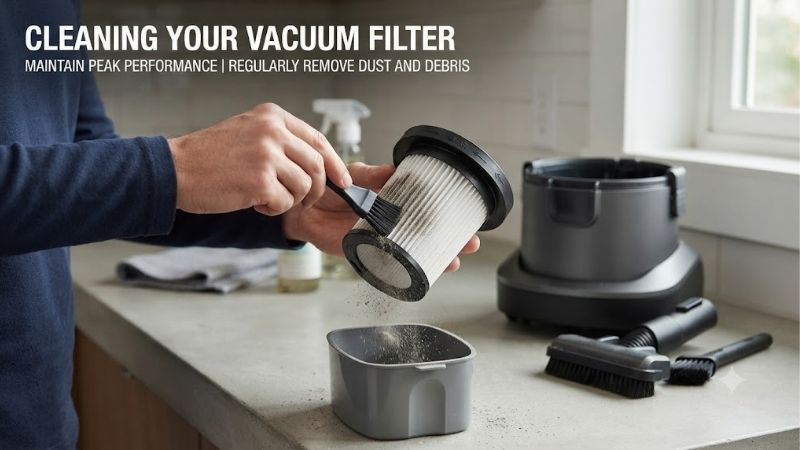
First, ensure you have a soft-bristled brush, such as an old toothbrush, to gently sweep away loose surface dust from the delicate crevices of the filter. You will also need a mild, unscented dish soap if your filters have accumulated oily residues, though plain water is usually highly recommended by most major manufacturers. To ensure a mess-free process, it is wise to keep a supply of soft towels nearby to absorb excess moisture immediately after rinsing.
To get the absolute best results during your cleaning routine, you should choose a specialized microfiber cloth like [Product Name] to gently wipe down the plastic housing without scratching the surface. Additionally, having a small, dedicated bucket filled with warm water can make the pre-soaking process much easier for heavily soiled foam inserts. Once you have these simple tools arranged on your counter, you are fully prepared to begin the washing process.
Detailed Step-by-Step Washing and Maintenance Process
Always start the cleaning process by completely unplugging your vacuum cleaner from the wall outlet, or removing the rechargeable battery pack if you are using a cordless stick model. Press the release latch to remove the dust canister from the main body, then carefully pop open the filter compartment to slide out the dirty elements. Take a moment to inspect the filters for any visible holes, tears, or structural thinning, as damaged filters must be replaced immediately.
- Gently tap the filter: Hold the dirty filter deep inside a trash bin and tap it gently against the side to knock loose the heavy, superficial layers of dust and hair.
- Rinse with cool water: Hold the filter under a gentle stream of running tap water, ensuring the water flows through the clean side first to push the dirt outward.
- Squeeze the foam gently: If you are washing a foam filter, squeeze it gently under the running water to work out the deeply embedded grey silt.
- Use mild soap if needed: For extremely stubborn odors or oily grime, apply a single drop of mild dish soap and work it into a light lather before rinsing completely.
- Rinse until clear: Continue running water through the filter until the water draining from the bottom is 100% clear and free of any grey tint or soap bubbles.
Do not use high-pressure water sprays, boiling hot water, or harsh chemical disinfectants like bleach, as these can easily warp the plastic frames and dissolve the delicate fibers. Gentle, patient rinsing is the safest way to clear out the microscopic dust without ruining the shape of the filter. Once the water runs clean, you have successfully completed the active washing stage of your maintenance.
Safe Air-Drying and Reassembly Guidelines to Prevent Mold
The single most critical step in the entire filter care process is allowing the washed components to dry completely before putting them back into your vacuum. If you reassemble the machine while the foam or felt is even slightly damp, the dark, sealed interior of the filter chamber will rapidly grow black mold and musty bacteria. This mold will not only ruin the filter but will also blast highly toxic spores and foul, sour odors into your home the very next time you turn the machine on.
Place your clean filters flat on a dry towel in a well-ventilated room that receives plenty of natural airflow, turning them over once or twice to ensure even drying. Never use a clothes dryer, a hair dryer on high heat, or place the filters directly on top of a hot radiator, as intense heat will quickly shrink the synthetic materials and melt the rubber seals. Allow the filters to air dry for a full 24 hours to guarantee that all internal moisture has completely evaporated.
Once the 24-hour drying period has passed, give the filters a gentle squeeze to verify that there are no cool, damp spots hidden in the center of the foam. Slide the dry filter back into its protective plastic housing, ensuring it sits completely flush without any gaps that could allow dirty air to bypass the filtration system. Snap the filter cover securely back into place, reattach the dust canister, and your vacuum is ready to deliver maximum suction power once again.
Advanced Strategies and Best Clean Vacuum Filter Practices
To maintain a truly spotless home with minimal effort, it helps to understand the engineering behind different filter types and how to optimize their performance. While basic washing is highly effective for some parts, other advanced filtration units require completely different care strategies to avoid permanent damage. Let us take a deep dive into the pros and cons of washing various filter styles and explore the most common mistakes that homeowners make.
Pros and Cons of Washing vs Replacing Different Filter Types
When deciding on a clean vacuum filter routine, it is vital to know whether your specific machine uses washable or non-washable elements. Washable foam and felt pre-motor filters are highly popular because they are incredibly cost-effective, allowing you to reuse them dozens of times before needing a replacement. This eco-friendly design saves you money and reduces plastic waste, making it a highly attractive feature for budget-conscious families. [Check Out Affordable Washable Replacement Filters on Amazon]
However, the downside to washable filters is that every single wash cycle slightly degrades the structural density of the synthetic fibers, allowing microscopic dust to slowly leak through over time. Furthermore, true HEPA post-motor filters, which capture 99.97% of tiny particles, are often completely non-washable because water instantly ruins their paper-based micro-glass fibers. Trying to wash a non-washable HEPA filter will clog its microscopic pores permanently, rendering it useless and forcing you to purchase a costly replacement immediately.
For these high-efficiency filters, the best practice is to gently tap them clean over a trash can every few months and replace them entirely once a year. Understanding this crucial distinction prevents you from accidentally destroying your vacuum’s most expensive protective components while trying to maintain them. Balancing regular washing with timely replacements is the ultimate strategy for consistent household dust control.
Critical Mistakes and Pro Tips for Flawless Filter Care
One of the most frequent mistakes people make is running their vacuum cleaner with no filter installed because they are in a rush and do not want to wait for the wet filter to dry. Running a vacuum without its filter allows heavy dust, sand, and sharp debris to fly directly into the high-speed motor assembly, causing instant and catastrophic mechanical failure. Always keep a spare set of cheap backup filters on hand so you can use your machine while the main set is drying.
Another common pitfall is using aggressive tools like stiff wire brushes or high-pressure air compressors to blast the dust out of delicate paper filters. While this might look satisfying, the high pressure easily tears microscopic holes in the filter media, creating wide-open pathways for allergens to escape. Always stick to gentle hand tapping and soft-bristled brushes to preserve the physical integrity of the filtration fibers.
A highly useful pro tip is to add a single drop of your favorite organic essential oil, like lavender or eucalyptus, to the completely dry foam filter before reassembling the unit. As the exhaust air flows through the scented filter, it will naturally disperse a light, refreshing aroma throughout your home as you vacuum. This simple trick completely neutralizes any lingering pet odors and turns a boring household chore into a highly pleasant, therapeutic experience.
Establishing a Regular Maintenance and Replacement Schedule
The key to long-term vacuum efficiency is consistency, which is why establishing a simple calendar reminder is highly recommended. For households with average cleaning needs, a quick monthly filter wash is usually more than enough to keep the machine running beautifully. However, if you have multiple shedding pets, thick carpets, or family members with severe seasonal allergies, you should aim to wash the pre-motor filters every two weeks.
In addition to regular washing, you must also recognize when a filter has reached the end of its natural, functional life. Over six to twelve months of heavy use, the foam will begin to crumble, the rubber gaskets will lose their airtight seals, and the paper backing will remain permanently grey despite thorough washing. Replacing these worn-out elements with fresh, high-quality parts ensures your machine maintains its maximum pickup capacity and operates at peak energy efficiency.
Most manufacturers recommend replacing your primary foam filters every six months and your post-motor HEPA filters once every twelve months for the best results. Keeping a log of when you last changed your filters makes it incredibly easy to stay on top of your appliance’s health. Taking these small, proactive steps ensures that you never have to deal with sudden suction loss or frustrating motor clogs during your busy cleaning days.
Consistently Maintaining Your Household Cleaning Efficiency
Keeping your home environment fresh, healthy, and completely free of irritating allergens is a continuous process that relies on the health of your appliances. A consistent clean vacuum filter routine is the absolute foundation of successful, stress-free home maintenance, ensuring that every speck of dust you pick up remains locked away safely. Explore the wide selection of top-rated, premium replacement parts and cleaning accessories on Amazon today to keep your household vacuum performing at its absolute best for many years to come!
Top-Rated Picks


Filtrete 16x25x1 Air Filter MERV 5, 6-Pack AC Furnace HVAC, MPR 300 Basic Dust Defense, Pleated Electrostatic, Removes Lint


| Product | Brand | Rating | Reviews | Price |
|---|---|---|---|---|
| Filtrete 14x30x1 Air Filter MERV 5, 6-Pack AC Furnace… | — | ★ 4.7 | 160.2k | $27.96 |
| Filtrete 20x20x1 Air Filter MERV 5, 6-Pack AC Furnace… | — | ★ 4.7 | 160.1k | $39.99 |
| Filtrete 16x25x1 Air Filter MERV 5, 6-Pack AC Furnace… | — | ★ 4.7 | 160.1k | $27.96 |
| Filtrete 16x20x1 Air Filter MERV 5, 6-Pack AC Furnace… | — | ★ 4.7 | 159.6k | $33.84 |
| Filterbuy 16x30x1 Air Filter MERV 8 Essential Dust & … | Filterbuy | ★ 4.7 | 158k | $49.96 |


Write Your Review
No reviews yet. Be the first to share your experience!