Cleaning cpap machine maintenance can seem overwhelming to sleep apnea patients who struggle with hose moisture or reservoir scaling. However, keeping your sleep therapy equipment sanitized is vital for respiratory health. Our easy instructions will show you how to maintain your device safely and prevent all harmful bacteria buildup every night.
Understanding the Importance of Cleaning CPAP Machine Systems
Every night, your sleep therapy equipment works tirelessly to deliver pressurized, humidified air directly into your lungs to keep your airways open. This continuous cycle of warmth and moisture creates an ideal environment for biological pathogens to multiply if left unchecked. Establishing a consistent schedule for cleaning cpap machine parts is not merely an aesthetic choice; it is a fundamental aspect of managing your sleep apnea therapy safely. When you neglect this routine, you risk inhaling mold spores, mildew, and accumulated bacteria with every single breath you take.
Preventing Bacteria Growth with a Cleaning CPAP Machine Routine
The constant presence of moisture inside the humidifier water tub and the long, dark tubing creates a perfect habitat for micro-organisms. Over several days, a thin biofilm can develop on the inner lining of these components, serving as an anchor for active bacterial colonies. Regular cleaning cpap machine accessories ensures this microscopic layer is disrupted and washed away before it can pose a serious threat to your health.
When these bacterial colonies are allowed to expand, they can release harmful pathogens into the airflow, leading to chronic sinus infections, sore throats, or even severe respiratory conditions like bronchitis. By taking a few minutes to sanitize your gear, you establish a reliable barrier against these invisible microscopic threats, ensuring your sleep apnea therapy remains entirely therapeutic rather than hazardous.
Extending Component Lifespan by Cleaning CPAP Machine Parts
Medical-grade silicone is the primary material used in modern CPAP mask cushions because it is incredibly soft and forms an airtight seal against your face. However, this flexible material is highly vulnerable to the natural oils, sweat, and dead skin cells produced by your face overnight. If you do not perform a routine cleaning cpap machine process, these facial oils will gradually degrade the silicone, causing it to become brittle, yellowed, and prone to leaking air.
Once a mask cushion loses its structural integrity, it can no longer maintain a secure seal, forcing you to tighten the headgear straps to uncomfortable levels or purchase expensive replacements ahead of schedule. Regularly washing your mask cushion preserves its flexibility and seals, saving you hundreds of dollars in unnecessary replacement parts over the year. Keeping your components clean ensures that your therapy remains highly cost-effective and physically comfortable.
Ensuring Fresh Sleep Therapy via a Cleaning CPAP Machine Routine
There is nothing more discouraging than putting on your mask at bedtime only to be greeted by a stale, musty, or chemical odor. Stagnant water left in the humidifier reservoir rapidly becomes sour, imparting an unpleasant smell to the pressurized air delivered to your nose. Engaging in a simple daily cleaning cpap machine habit completely eliminates these foul odors, replacing them with a crisp, neutral, and incredibly refreshing breathing experience.
A clean breathing path has a massive psychological impact on your sleep quality, making it much easier to relax and drift off to sleep without distraction. When your equipment smells fresh, you are far more likely to remain compliant with your prescribed sleep apnea therapy over the long term. This subtle improvement in overall comfort can be the deciding factor between struggling with your device and waking up fully energized every morning.
Your Comprehensive Guide to Safely Cleaning CPAP Machine Parts
Embarking on your CPAP maintenance journey does not require advanced technical skills or expensive chemical solutions. Most manufacturers recommend using simple, household items that are gentle on medical-grade plastics yet highly effective at removing oil, dirt, and organic deposits. Understanding the exact steps for cleaning cpap machine accessories will demystify the process and allow you to complete your weekly deep clean in less than fifteen minutes with total confidence.
Gathering Your Essential Cleaning CPAP Machine Supplies
Before you begin, gather all your necessary supplies in a clean workspace, preferably near a wide sink or a large washbasin. You will need a mild, unscented dish soap that does not contain moisturizers, antibacterial agents, or heavy perfumes, as these chemicals can leave a greasy residue on your silicone parts. Additionally, keep a supply of distilled water nearby to rinse and refill your humidifier chamber, which prevents minerals from bonding to the metal plate.
To get the best results, you should choose a specialized microfiber cloth like [Product Name] to avoid scratching the delicate plastic surfaces of your mask and water tub. A high-quality hose brush designed specifically for CPAP tubes is also indispensable for scrubbing those hard-to-reach inner walls where condensation settles. Investing in a dedicated cleaning kit makes the process much faster and protects your medical equipment from premature wear.
Avoid using harsh chemical agents such as bleach, rubbing alcohol, dishwashing detergents, or highly concentrated essential oils during your routine. These aggressive compounds can degrade the flexible polymers, crack the hard plastic components, and release highly toxic chemical vapors into your breathing tube when the machine is turned on. Sticking to mild soap and warm water is the safest, most reliable way to keep your therapy equipment immaculate.
Step-by-Step Instructions for Cleaning CPAP Machine Parts
Follow this straightforward, step-by-step sequence to perform a thorough weekly sanitation of your entire setup. Always begin by unplugging your CPAP blower unit from the wall outlet to eliminate any risk of electrical shock during maintenance. Carefully disconnect the mask assembly from the long breathing tube, then detach the tube from the back of the blower unit and slide out the plastic humidifier water reservoir.
- Wash the components: Fill your clean sink or washbasin with warm, soapy water and submerge the mask, tubing, and reservoir completely. Let them soak for about ten to fifteen minutes to loosen oils and mineral deposits.
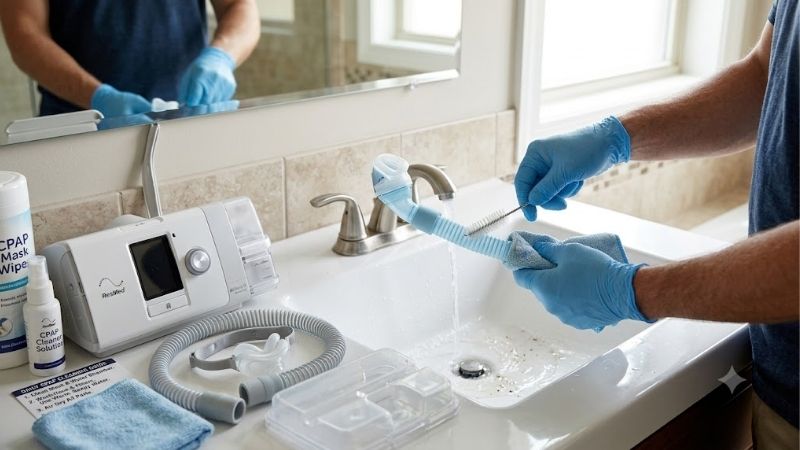
- Scrub the interior: Use your specialized tube brush to scrub the entire interior length of the hose, moving it gently back and forth to clear away any hidden biofilm.
- Clean the mask: Gently wipe the mask cushion and hard frame with a soft cloth, paying close attention to the small exhalation ports.
- Rinse thoroughly: Take each washed component out of the soapy bath and rinse it completely under clean, warm running tap water until all soap bubbles are gone.
- Inspect the parts: Check each item for visible signs of wear, tears, or cracking that might require immediate replacement before you assemble them back together.
- Allow to dry: Place all rinsed parts on a clean, dry towel away from direct sunlight and let them air dry completely.
Safe Post-Wash Drying After Cleaning CPAP Machine Elements
Proper drying is an incredibly vital step that must never be rushed, as reassembling damp components creates a humid breeding ground for new bacteria. Hang your long breathing tube over a door, towel rack, or shower curtain rod so that both open ends point downward, allowing gravity to drain any trapped water droplets. Place your mask cushion, headgear, and humidifier water tub open-side down on a clean towel in a well-ventilated room to air dry.
Once every single part is completely dry to the touch, inspect them one final time before starting the reassembly process. Connect the headgear straps back to the plastic mask frame, push the mask connector into the flexible end of the dry tube, and attach the other end to your blower outlet. Finally, slide the dry humidifier water chamber back into the machine, ensuring a tight, secure fit that prevents any air leaks during operation.
Advanced Strategies and Pro Tips for Cleaning CPAP Machine Units
Taking your sleep therapy maintenance to the next level involves exploring automated solutions, understanding common user errors, and establishing a highly disciplined schedule. While the basic washing routine is simple, integrating advanced strategies can save you valuable time and offer peace of mind regarding your respiratory health. Let us examine how automated devices compare to manual scrubbing and look at the most common pitfalls to avoid.
Pros and Cons of Automated Cleaning CPAP Machine Sanitizers
Automated sanitizing devices, which typically utilize ozone gas or ultraviolet (UV-C) light, have soared in popularity due to their incredible convenience and speed. The primary advantage of these systems is their ability to destroy 99% of bacteria, viruses, and mold spores within minutes without requiring water or soap. This makes them a highly attractive option for busy individuals who want to ensure their equipment is sterilized with the push of a single button. [Explore Top-Rated CPAP Sanitizers on Amazon]
However, users must understand that these machines cannot remove physical oil, sweat, or skin cells from your mask, meaning you must still wash the parts manually to keep the silicone clean. Furthermore, ozone sanitizers can leave a strong, temporary odor and may void the manufacturer warranty of certain popular CPAP machines if the gas degrades the internal silicone foam. Weighing these benefits against the high initial investment of approximately $100 to $200 is essential before deciding on an automated unit.
Crucial Mistakes to Avoid While Cleaning CPAP Machine Hoses
One of the most frequent and damaging mistakes CPAP users make is using standard tap water to fill their humidifier chambers. Tap water contains minerals like calcium and magnesium that leave hard, white scaling deposits on the metal heating plate over time. These deposits are highly resistant to standard scrubbing, degrade the efficiency of your humidifier, and can harbor bacteria that are difficult to eliminate with normal washing.
Another common error is drying your plastic tubing or silicone mask cushions in direct sunlight. While sunlight has natural sanitizing properties, the intense ultraviolet rays will rapidly degrade the delicate medical-grade materials, making them stiff, discolored, and fragile within a few weeks. Always opt for air-drying your equipment in a shaded, cool, and well-ventilated indoor area to ensure your gear lasts as long as possible.
Lastly, never run your CPAP machine to speed up the drying process of your hose or internal components unless the user manual explicitly permits a drying mode. Blowing high-velocity air through a damp hose can push water droplets directly into the blower motor’s electrical housing, causing permanent damage to the expensive machine. Patience is key; allow your parts to dry naturally on a clean towel to protect your financial investment.
A Rigid Weekly Schedule for Cleaning CPAP Machine Gear
Establishing a rigid, easy-to-follow schedule prevents your cleaning chores from becoming a stressful, disorganized burden. On a daily basis, your primary focus should be on the parts that directly touch your skin or hold standing water. Empty any leftover water from your humidifier chamber every morning to prevent stagnation, and give your mask cushion a quick wipe with a gentle, alcohol-free CPAP wipe to remove overnight facial oils.
Your weekly routine should involve a deeper, more thorough clean of the entire breathing apparatus, including the hose, headgear, and water tub. Dedicate a specific morning, such as Sunday, to soaking and scrubbing these components in warm, soapy water so they have ample time to air dry before bedtime. This weekly deep wash is the cornerstone of keeping your airway safe from mold spores and bacterial accumulation.
On a monthly basis, take the time to inspect your disposable fine-particle filters and replace them if they appear grey or dusty. Most machines feature both a reusable foam filter and a ultra-fine paper filter that must be replaced regularly to keep dust out of the motor. Check the structural integrity of your silicone seals and plan to replace your mask cushion every three to six months for optimal performance.
Consistently Maintaining Your Sleep Therapy Health
Maintaining a pristine sleeping environment is key to reaping the full health benefits of your sleep apnea treatment. Consistently cleaning cpap machine equipment prevents the accumulation of harmful bacteria, protects your delicate respiratory system, and extends the overall life of your valuable device. By making this simple sanitation process a natural part of your daily and weekly routine, you can enjoy peaceful, hygienic, and highly restorative sleep every single night.
Ready to simplify your therapy maintenance routine and achieve absolute peace of mind? Investing in the right tools, such as specialized tube brushes, gentle soaps, and premium drying racks, makes the entire process incredibly quick and effortless. Discover high-quality, top-rated products on Amazon today to keep your system performing at its best and ensure you breathe crisp, healthy air every single night!
Top-Rated Picks


| Product | Brand | Rating | Reviews | Price |
|---|---|---|---|---|
| CleanSmart CPAP Disinfectant Spray, Kills 99.9% of Ba… | CleanSmart™ | ★ 4.5 | 11.6k | $24.99 |
| Aveen CPAP Tube and Mask Cleaning Brush, Suitable for… | AveenCPAPAccessories | ★ 4.6 | 4.7k | $9.98 |
| CPAP Cleaning Kit Hose and Mask for CPAP Hanger Dryer… | CPAPESSENTIAL | ★ 4.6 | 857 | $22.95 |
| Essential Values CPAP Cleaner Pre-Wash, Safe & Scent-… | EssentialValues | ★ 4.5 | 651 | $15.69 |
| CPAP Cleaning Kit with Hose Dryer for Universal 22mm … | Lemintae | ★ 4.7 | 27 | $51.19 |


Write Your Review
No reviews yet. Be the first to share your experience!