Dryer lint filter replacement tasks can seem minor, but ignoring a damaged screen will ruin your appliance and skyrocket bills. If you want to prevent home fire risks, maintain powerful airflow, and keep clothes soft, our practical instructions are here to help. We will show you how to swap your old parts and keep things running beautifully today.
Why a Dryer Lint Filter Replacement is Vital for Safety
Dryers are remarkable, heavy-duty appliances that we rely on weekly to clean up mountain-sized laundry piles quickly and safely. However, the high temperatures required to extract water from thick fabrics generate an immense volume of airborne lint that must be carefully managed. When the internal mesh screen suffers from tears, punctures, or simple physical degradation, it can no longer trap these fine particles, which leads to major internal failures. Investing a little time to complete a dryer lint filter replacement is the ultimate step to protect your physical home and optimize appliance efficiency.
Preventing Destructive House Fires and Overheating
The absolute most dangerous consequence of operating a dryer with a torn or missing lint trap is the dramatic increase in house fire risks. When the screen fails to catch loose fabric threads, the exhaust air forces those dry, highly flammable fibers directly into the internal heating element chambers. Once these accumulated particles make direct physical contact with hot electrical coils or open gas flames, they can ignite instantly, spreading fire through your laundry room vents within minutes.
According to national fire safety statistics, thousands of residential fires are caused annually by restricted appliance airflow and poor maintenance habits. A simple, timely dryer lint filter replacement completely eliminates this hazard by restoring an impenetrable physical barrier against stray clothing debris. Taking this quick preventive action provides absolute peace of mind for your family, ensuring that your laundry days remain entirely safe and stress-free.
Restoring Drying Efficiency and Airflow Dynamics
Have you noticed that your heavy blankets, damp jeans, and thick bath towels are suddenly taking two or three full cycles to dry completely? When your screen is clogged with a sticky, invisible film of fabric softener residue or micro-fine dust, the blower fan struggles to push warm, moist air out of the drum. This restricted airflow keeps moisture trapped inside the metal drum, forcing your appliance to spin repeatedly without actually evaporating the dampness.
Installing a brand-new, clean mesh assembly immediately improves internal airflow dynamics, allowing the humid air to escape through the exhaust pipe effortlessly. Your laundry will once again dry in a single, fast cycle, leaving your fabrics feeling incredibly soft and completely free of musty smells. Restoring this efficient thermodynamic pathway is the ultimate secret to getting your laundry done in record time without frustrating delays.
Reducing Monthly Energy Bills and Machine Wear
Running your laundry machine for multiple consecutive cycles to dry a single load of clothes consumes a massive amount of electricity. This unnecessary energy consumption quickly adds up, leading to shockingly expensive monthly utility bills that drain your household budget. Furthermore, forcing the internal motor and heating elements to run for extended periods causes premature mechanical wear, leading to costly repair bills down the road.
Opting for a quick dryer lint filter replacement is a highly cost-effective solution that pays for itself in utility savings within just a few months. By allowing the machine to work at its peak thermodynamic efficiency, you reduce overall run times and minimize wear on the expensive drive belt and drum bearings. It is a smart, energy-efficient upgrade that keeps your hard-earned money in your wallet while preserving your household hardware.
Step-by-Step Guide for Dryer Lint Filter Replacement
Replacing your damaged mesh screen is an incredibly simple, rewarding home maintenance task that requires no professional plumbing or electrical expertise. By following a structured, methodical approach, you can complete the entire swap in less than ten minutes and immediately restore your appliance’s performance. Let us walk through the exact steps required to execute this essential chore safely and efficiently using basic, affordable tools you can find online.
Gathering Your Essential Tools and Replacement Parts
Before you begin dismantling your dryer, you must gather a few simple, high-quality cleaning instruments to ensure the entire replacement process is smooth and completely mess-free. You should choose a professional lint brush like [Product Name] to easily clear out any loose debris hiding deep inside the internal slot. Additionally, having a high-suction vacuum cleaner equipped with a narrow crevice attachment like [Product Name] is highly recommended for extracting deep blockages safely. Having these specific, affordable maintenance tools at your disposal prevents dust from flying around your laundry room and guarantees a highly professional cleaning result.
Most importantly, you must order the exact replacement screen that is specifically engineered to fit your dryer’s unique brand and model number. You can locate your machine’s model number printed clearly on a small metal sticker situated inside the door frame or on the back panel. Once you have this number, you can easily find a compatible replacement filter like [Product Name] on Amazon to guarantee a perfect, airtight seal. Avoid buying generic screens that do not explicitly list your model, as even a millimeter of difference can cause air leaks.
Removing the Old Filter and Cleaning the Slot
- Disconnect the main power supply safely: Safety should always be your absolute top priority when performing any appliance maintenance in your home, so make sure to unplug your dryer from the wall outlet or flip the corresponding circuit breaker in your electrical panel before starting. This vital step completely eliminates any risk of accidental electrical shock or sudden activation of the high-speed blower fan while your hands are deep inside the machinery.
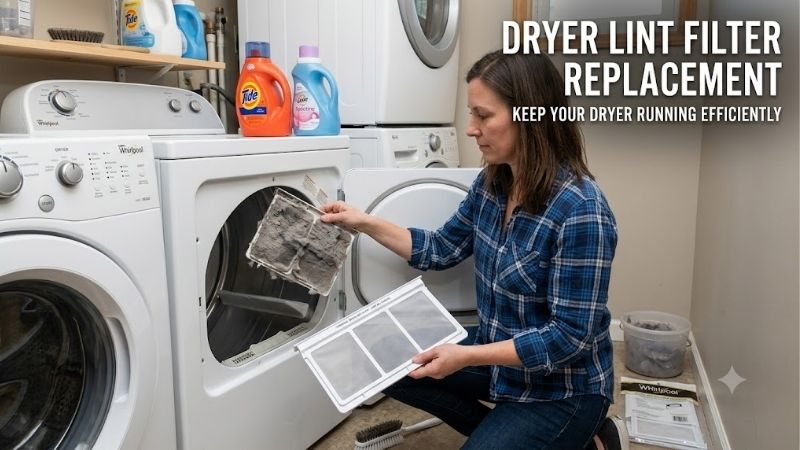
- Pull out the old screen and inspect the housing: Locate your current filter, which is typically situated just inside the door opening or on the top metal panel depending on your dryer’s brand, and slide it straight upward out of its housing. Take a close look at the surrounding plastic track for any physical damage, hairline cracks, or accumulated grime that might prevent your brand-new replacement filter from sliding in smoothly.
- Clean the deep internal housing with specialized tools: Insert your long, flexible lint brush directly into the empty slot, twisting it gently to catch and pull out those thick, grey dust cakes that collect at the bottom of the vent over several months of heavy laundry use. Follow up by inserting your vacuum’s narrow crevice tool deep into the opening to suck out any remaining loose particles that the brush missed, ensuring the entire pathway is completely clear of airflow restrictions.
Installing the New Filter and Testing Performance
- Slide the new replacement filter into the slot: Take your fresh, clean replacement filter and align it carefully with the plastic tracks of the internal housing slot. Gently push the filter downward until it clicks securely into place or sits completely flush with the surrounding surface, ensuring there are absolutely no visible gaps around the outer rubber seals.
- Perform a thorough physical seal check: Run your fingers slowly along the outer edges of the newly installed filter to verify that it forms a secure, airtight barrier against escaping air. If the screen sits too high, wiggles, or feels loose, slide it out and check the bottom of the slot for compacted dust that might be blocking its path.
- Run a short test cycle to verify success: Plug your machine back in, place a few clean, damp towels inside the drum, and start a standard drying cycle for five minutes. Listen carefully for any unusual whistling sounds that could indicate air leaks, and verify that the exhaust vent on the outside of your house is releasing a steady, warm stream of air.
Advanced Maintenance, Pros and Cons, and Best Practices
To truly maximize your hardware investment and keep your home safe, you must understand the long-term care guidelines, technical trade-offs, and common user errors associated with these essential laundry appliances. While replacing the screen is the primary step, adopting regular maintenance habits will ensure that your entire laundry system remains highly efficient, cost-effective, and fully functional. Let us examine the relative advantages of different filter types, washing techniques, and replacement schedules to help you maintain a pristine home setup.
Pros and Cons of OEM Versus Aftermarket Filters
The primary advantage of purchasing an Original Equipment Manufacturer (OEM) filter is the guaranteed physical fit, exceptional material durability, and compliance with factory standards. These official parts are engineered to meet strict heat resistance and mesh density specifications, ensuring that the plastic frame resists high temperatures and the screen stays perfectly secure over years of heavy daily use. However, the notable drawback of OEM replacements is their relatively high cost, which can sometimes be double the price of third-party options on retail shelves, making them a significant upfront investment.
On the other hand, aftermarket replacement filters offer outstanding value and are highly budget-friendly, making them an attractive choice for cost-conscious homeowners looking to save money. These generic alternatives perform exceptionally well under standard household conditions, are readily available on Amazon for fast shipping, and often come in convenient multi-packs. However, some lower-quality aftermarket options can occasionally feature thin plastic frames that warp slightly under extreme dryer heat, potentially creating minor air gaps that allow fine lint to bypass the screen and clog your exhaust vent over time.
Cleaning and Washing Your Reusable Mesh Screens
Even if your screen appears visually clean, fabric dryer sheets and liquid detergents can leave a clear, invisible chemical film that gradually blocks the microscopic pores of the mesh. This invisible buildup can severely restrict airflow over time, even if you are diligent about scraping away physical wool and cotton fibers after every single load of laundry. To check for this issue, pour a small cup of warm water directly onto your filter screen; if the water pools instead of draining instantly, your filter needs a thorough washing.
To restore your filter’s permeability, submerge it in a sink filled with warm, soapy water and scrub the mesh gently using a soft-bristled brush. Avoid using harsh chemical bleaches or abrasive scouring pads, as these aggressive compounds can easily tear the delicate synthetic fibers and ruin the seals. Allow the filter to air dry completely for at least twelve hours before sliding it back into your appliance to prevent any dampness from creating musty mold or mildew inside your vents.
Establishing a Reliable Replacement and Cleaning Schedule
To keep your home completely safe from restricted airflow hazards, you must establish a highly disciplined, regular cleaning and replacement routine that is easy to follow. On a daily basis, make it an absolute rule to scrape the lint off the screen before starting every single load of laundry. This simple, five-second habit keeps the main air passage clear, prevents excessive heat buildup, and ensures your clothes dry as quickly and softly as possible without wasting energy.
On a deeper level, plan to wash your reusable mesh screen with warm, soapy water at least once every three to six months to eliminate chemical films. Additionally, inspect the physical frame of your filter once a year for fine hairline cracks, loose mesh edges, or worn rubber seals. Replacing your entire filter assembly once every two to three years is a highly recommended best practice to maintain optimal drying speeds, complete safety, and peak energy efficiency.
Consistently Maintaining Your Laundry Performance
Ensuring that your household appliances are fully maintained is the key to enjoying a safe, efficient, and stress-free home. By executing a simple dryer lint filter replacement today, you instantly protect your property from destructive fire hazards, lower your monthly utility bills, and restore that satisfying, brand-new drying speed to your machine. Don’t wait until your dryer begins to overheat or your clothes take hours to dry; taking action now preserves your expensive hardware and keeps your laundry day running smoothly. Discover a wide range of premium, top-rated replacement parts and dedicated vent cleaning tools on Amazon today to keep your home running beautifully and securely for many years to come!
Top-Rated Picks


Dryer Vent Cleaner Kit – Flexible Lint Brush for Household Cleaning, Long Refrigerator Coil Brush, Dust & Pet Hair Remover (1-Pack)


| Product | Brand | Rating | Reviews | Price |
|---|---|---|---|---|
| The Professional Dryer Vent Cleaner Kit -(20-Feet) In… | SmartHouseInc | ★ 4.4 | 13.3k | $24.98 |
| Dryer Vent Cleaner Kit – Flexible Lint Brush for Hous… | Sold_By_Cheapnwork | ★ 4.3 | 8.2k | $5.88 |
| Sealegend 50 Feet Dryer Vent Cleaner Kit/Lint Remover… | Sealegend | ★ 4.4 | 1.6k | $34.99 |
| Holikme 16 Feet Dryer Vent Cleaner Kit, Lint Remover,… | Holikme | ★ 4.6 | 586 | $14.99 |
| 4 Pieces Dryer Vent Cleaner Kit with Lint Brush – … | SWKTPP | ★ 4.1 | 254 | $14.99 |


Write Your Review
No reviews yet. Be the first to share your experience!