Vornado fan cleaning is essential for maintaining powerful airflow and healthy indoor air in your home during hot summer days. Over time, heavy dust accumulation can clog your circulator’s motor, causing it to overheat and run poorly. This comprehensive, easy guide provides simple steps to restore your fan to its full original performance right now.
Preparing for Your Vornado Fan Cleaning Session Safely
Embarking on a comprehensive deep-cleaning project for your premium air circulator is the absolute best way to protect your initial investment and enjoy a refreshing breeze all year round. Many people do not realize that the deep aerodynamic design of these specialized devices acts like a magnet for floating dust, pet dander, and microscopic pollen particles that settle deep inside the housing. Therefore, taking twenty minutes to perform a complete disassembly and wash-down not only improves your home’s overall indoor air quality but also prevents premature mechanical burnout. Before you begin taking the protective plastic casings apart, you must organize a clean workspace and understand the fundamental safety rules to avoid damaging the internal electronics.
Choosing the Right Catchy Titles for Cleaning Projects
When planning to share your maintenance achievements or search for the absolute best guides online, having clear titles is essential for finding proper step-by-step guidance. If you are documenting this process to help other homeowners, organizing your thoughts around a highly descriptive heading will keep your DIY workflow logical and structured. A great guide should address the user’s immediate concerns while maintaining high search visibility on major modern platforms. Here are three highly recommended, catchy SEO-friendly titles to consider for organizing this specific appliance maintenance project:
- “How to Clean a Vornado Fan: The Easy Way to Restore Airflow”
- “A Step-by-Step Guide to Deep Cleaning Your Vornado Circulator”
- “The Simple Method for Quick Vornado Fan Cleaning and Maintenance”
Selecting one of these mental frameworks before you start working ensures that you remain focused on both physical safety and highly methodical execution. It helps to envision the end goal, which is a pristine, dust-free machine that operates just as quietly as it did on the day you unboxed it. By keeping these targeted goals in mind, you will naturally pay closer attention to the smaller, easily overlooked components like the motor shaft, blade hub, and deep screw wells.
What You Will Need: Essential Tools for the Job
To complete this task efficiently without damaging the premium materials of your fan, you must gather a few specialized tools beforehand. Using the wrong size screwdriver or harsh abrasive sponges can permanently scratch the outer plastic housing or strip the delicate metal threads holding the casing together. Preparing your toolkit in advance ensures a smooth, uninterrupted cleaning process that yields professional-grade results. You will need to collect the following items before unscrewing the housing:
- A Magnetic Screwdriver: You should select a high-quality magnetic screwdriver set like [Precision Magnetic Screwdriver Set] to easily reach deep into the narrow plastic screw wells without losing your hardware.
- Microfiber Cleaning Cloths: You should choose ultra-soft, lint-free microfiber cloths like [Premium Microfiber Cleaning Cloths] to safely wipe down the delicate interior blades and prevent scratches.
- An Electric Air Duster: You should consider purchasing a powerful, reusable electric air duster like [Eco-Friendly Cordless Air Duster] to blow away stubborn motor dust without using wasteful canned air.
- Mild Dish Soap and Warm Water: A gentle grease-cutting dish soap will dissolve sticky kitchen oils and heavy dust layers without degrading the synthetic polymer structure of the fan.
- A Soft Brush: An old toothbrush or a specialized detailing brush is perfect for cleaning the hard-to-reach grilles and the inner edges of the fan blades.
Having these precise instruments on hand turns a potentially frustrating household chore into an incredibly satisfying weekend project. Investing in high-quality maintenance tools is always a smart choice because you can use them for dozens of other electronics and household appliances down the road. If you need to upgrade your current toolbox with these essential items, you can find incredible deals and fast shipping options on Amazon right now.
Why Proper Dust Removal Saves Your Motor and Wallet
Failing to clean your household fan regularly is a major mistake that can lead to significant financial consequences over time. When thick dust layers accumulate on the trailing edges of the fan blades, they add unnecessary physical weight and alter the precise aerodynamic balance of the fan. This extra weight forces the small electric motor to draw more wattage from your wall outlet to spin at its designed RPM. Consequently, this increased electrical resistance generates excess heat within the motor casing, which quickly degrades the protective bearing lubricants and causes premature component failure.
By maintaining a clean fan, you ensure that the electric motor operates under optimal thermal conditions, which can save you a bundle on energy bills. A clean, free-spinning blade assembly allows the machine to move air with maximum efficiency, requiring less effort and less electricity. Over a hot summer season, the energy savings from a well-maintained fan can easily offset the cost of basic cleaning supplies. Taking care of your fan is a highly logical strategy to protect your wallet while enjoying a continuous flow of fresh, healthy air.
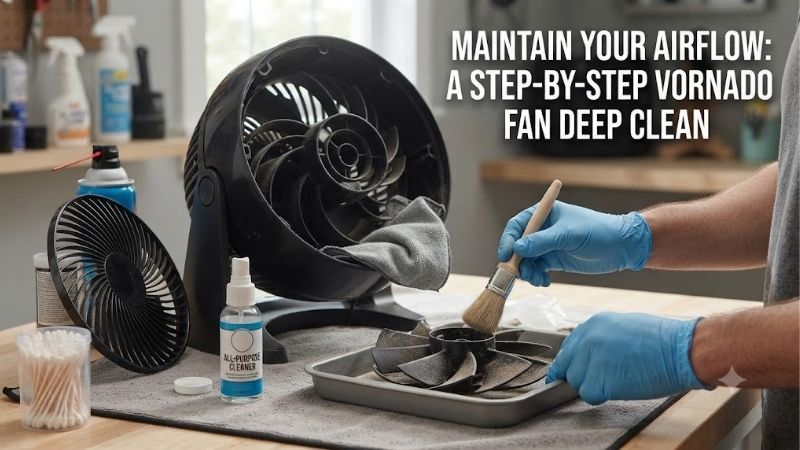
Step-by-Step Instructions for Deep Vornado Fan Cleaning
Performing a deep vornado fan cleaning requires a structured approach to ensure you do not break any plastic components or expose the motor to moisture. Unlike cheap box fans, these advanced circulators feature tight tolerances and precise interlocking clips that require gentle handling during teardown. If you rush through the process or use excessive force, you risk snapping the securing tabs, which can lead to annoying vibrations or rattling noises when you turn the unit back on. Following a structured, step-by-step plan is the best way to safely dismantle, clean, and reassemble your machine to factory standards. By breaking the process down into three distinct phases, you will maintain total control over every screw, clip, and delicate component.
Step-by-Step Guide: Unlocking the Grille and Blade Assembly
Before you begin, you must take absolute care to ensure the fan is completely disconnected from any live electrical source. Never attempt to clean or disassemble the unit while the power cord is plugged in, as this poses an immediate safety hazard. Once you have safely unplugged the cord, place the fan on a flat, well-lit table covered with a soft towel to prevent scratching the outer casing. Let’s begin the disassembly process using these detailed, highly structured steps:
- Step 1: Unplug and Place on Flat Surface. Disconnect the power plug from the wall outlet and place the circulator face-down on a protective towel.
- Step 2: Remove the Retaining Screws. Locate the deep screw holes on the back of the fan head and use your magnetic screwdriver to gently back out the three to five screws.
- Step 3: Pop the Grille Clips. Flip the fan back over, locate the small plastic clips around the perimeter of the front grille, and press them inward to release the front plate.
- Step 4: Pull Off the Front Grille. Carefully lift the front grille straight up and set it aside on your workspace for washing.
Once the front grille is removed, you will have direct access to the main fan blade assembly. Take a close look at the center hub of the blade; depending on your specific model, the blade may slide off the metal shaft directly, or it may be secured with a small nut. If there is a locking nut, turn it clockwise to loosen it, as these are typically reverse-threaded to prevent the blade from flying off during high-speed operation.
Slowly slide the fan blade off the metal motor shaft, making sure not to lose the tiny metal pin or washer located behind the blade hub. If the blade feels stuck due to built-up dirt, apply gentle, even pressure on both sides of the hub and rock it back and forth until it slides free. Set the blade next to the grille, and prepare your cleaning solution to wash away the accumulated grime.
Step-by-Step Guide: Safely Washing and Wiping Clean
Now that your fan is disassembled, you can focus on removing the greasy film and dust bunnies that have bonded to the plastic surfaces. The front grille and the fan blade assembly are made of durable, water-resistant plastic, which means they can be safely washed in a sink. However, you must keep the main motor housing completely dry and away from running water at all times to prevent electrical short-circuits. Follow these specific steps to wash the components thoroughly:
- Step 5: Wash the Grille with Warm Soapy Water. Submerge the front plastic grille in a sink filled with warm water and a few drops of mild dish soap, using a soft brush to scrub the slats.
- Step 6: Clean the Fan Blades Carefully. Wipe down the fan blade assembly with a soapy microfiber cloth, paying close attention to the leading and trailing edges of each blade.
- Step 7: Rinse and Dry Thoroughly. Rinse both pieces under clean running water, shake off the excess water, and dry them completely with a clean towel.
- Step 8: Dust the Motor Housing. Use your dry microfiber cloth and cordless electric air duster to blow out any loose dust hiding inside the rear motor vents.
While the washed parts are air-drying in a warm spot, use a slightly damp microfiber cloth to wipe down the exterior of the motor housing and the adjustment stand. Never spray water or cleaning chemicals directly onto the motor casing, as liquid can easily seep through the cooling vents and ruin the internal copper windings. If you notice any stubborn hair or fibers wrapped around the metal motor shaft, use a pair of tweezers to carefully pull them free.
Ensure that all washed plastic components are 100% dry before attempting to put the unit back together. Even a tiny droplet of water left inside the blade hub can migrate down the metal shaft and enter the motor bearings, leading to rust and mechanical failure. Patience is key during this step; letting the parts sit for an hour in a well-ventilated area is a highly effective way to guarantee complete dryness.
Step-by-Step Guide: Reassembly and Function Testing
Once you have verified that every single part is completely dry, you can begin the satisfying process of putting your Vornado fan back together. Reassembling the unit is simple, but you must align the parts precisely to ensure the fan runs smoothly without wobbling. If you force the blades onto the shaft incorrectly, you can damage the alignment flat, which will cause permanent operational noise. Follow these final reassembly steps to complete your project:
- Step 9: Align the Blade Hub. Slide the fan blade back onto the metal motor shaft, ensuring the flat side of the shaft aligns perfectly with the flat groove inside the blade hub.
- Step 10: Tighten the Nut. If your model has a retaining nut, spin it counter-clockwise to tighten it firmly, but do not overtighten as you can crack the plastic threads.
- Step 11: Secure the Grille and Screws. Snap the front grille back into the outer casing clips, flip the unit over, and reinstall the rear retaining screws using your magnetic screwdriver.
- Step 12: Run a Speed Test. Plug the power cord back into the wall outlet, set the fan on a stable surface, and turn it on to test all speed settings.
As the fan spins up to high speed, listen closely for any unusual humming, clicking, or rattling noises. If you hear anything out of the ordinary, turn the fan off immediately, unplug it, and check to see if the front grille is snapped in securely or if the blade is hitting the outer casing. In 99% of cases, a slight rattle simply means a clip is not fully seated or a screw needs to be tightened a bit more.
When everything is assembled correctly, you will immediately notice a dramatic difference in both the volume of air being circulated and the quietness of the operation. The air blowing from the freshly cleaned vents will smell clean and fresh, free of the dusty odor that often accompanies neglected appliances. Now that your fan is running beautifully, you can enjoy a cool, dust-free home environment all summer long.
Pro Tips, Pitfalls, and the Pros and Cons of Vornado Fan Cleaning
Maintaining your household appliances in peak condition requires a balance of proper techniques and an understanding of potential pitfalls. While the physical cleaning process is relatively straightforward, there are several expert tricks that can make the job much easier and prevent common accidents. Additionally, understanding the practical pros and cons of performing this maintenance yourself versus buying a new unit will help you appreciate the value of your labor. By adopting a proactive mindset and using the right maintenance products, you can keep your circulator running like brand new for a decade or more.
Expert Pro Tips and Critical Mistakes to Avoid
To ensure your cleaning session goes as smoothly as possible, you should implement a few proven strategies used by professional appliance technicians. One of the best tips is to apply a tiny drop of high-quality synthetic machine lubricant to the metal motor shaft before sliding the blade assembly back on. This simple step prevents the plastic hub from seizing onto the metal shaft, making your next seasonal teardown incredibly easy. Additionally, always keep a small cup or magnetic tray on your workspace to hold the tiny screws and plastic clips while you work. Here are some critical mistakes you must actively avoid during your maintenance routine:
- Never Use Harsh Chemicals: Avoid using acetone, gasoline, or strong chemical solvents on the plastic parts, as these will melt the synthetic polymers and ruin the finish.
- Avoid Wet Cleaning the Motor: Never submerge the motor assembly in water or spray liquid cleaner directly into the ventilation slots.
- Do Not Force the Plastic Parts: If a clip or grille does not slide out easily, stop and check for hidden screws instead of pulling harder and breaking the plastic.
- Always Dry Completely: Never reassemble the fan while the blades or grille are damp, as moisture will destroy the motor bearings and electrical wiring.
By keeping these simple warnings in mind, you will protect both your physical safety and the structural integrity of your high-end air circulator. Taking your time and working methodically is the absolute best way to ensure a successful outcome without any unexpected accidents. If you are looking for premium lubricants or specialized cleaning brushes to make this chore even easier, Amazon offers an incredible selection of affordable maintenance gear.
The Pros and Cons of Regular DIY Fan Maintenance
Before you decide to tackle this project, it is helpful to look at the practical advantages and disadvantages of regular DIY fan maintenance. Understanding these trade-offs will help you decide how often to clean your unit and whether you should invest in higher-quality tools. On the positive side, regular cleaning completely restores the fan’s original aerodynamic efficiency, which dramatically reduces wear and tear on the motor. Furthermore, keeping the blades clean prevents the accumulation of unsightly dust bunnies that can fly off and trigger severe respiratory allergies in sensitive family members.
On the negative side, disassembling a premium air circulator takes about twenty to thirty minutes of your free time and requires a steady hand to avoid stripping screws. If your fan is very old, the plastic casing may become brittle over time, increasing the risk of cracking a clip during disassembly. However, when you compare the minor effort involved to the high cost of buying a brand-new replacement fan (which can range from $50 to $100), performing a DIY cleaning is the obvious winner. It is a highly satisfying, cost-effective way to extend the lifespan of your cooling equipment and maintain a healthy home environment.
Strategic Buying Advice for Quality Maintenance Gear
If you want to make your seasonal maintenance tasks as effortless as possible, investing in a few high-quality specialized tools is a game-changer. Standard household screwdrivers often have thick shafts that cannot reach deep into the narrow plastic holes of a Vornado housing, leading to stripped screw heads and frustration. Purchasing a dedicated set of long-reach magnetic screwdrivers will completely eliminate this issue, making the teardown process a breeze. Additionally, having a dedicated cordless air duster on hand allows you to clean computer keyboards, AC vents, and delicate electronics in seconds.
To find the absolute best deals on these handy household items, we highly recommend browsing the extensive tools and home improvement sections on Amazon today. You can read hundreds of real-world user reviews to find reliable, highly rated products that offer excellent value for your money. Stocking your utility closet with the right tools ensures that you are always prepared to keep your home appliances running perfectly. Take action today to upgrade your home maintenance routine and enjoy a cleaner, cooler living space all year round.
Conclusion: Enjoying the Benefits of Your Clean Vornado Fan
In conclusion, taking the time to complete a thorough vornado fan cleaning is one of the smartest things you can do to protect your home comfort and save money on energy bills. By following our easy, step-by-step instructions, you can safely wash away months of accumulated dust and restore your circulator to its peak quiet performance. Don’t wait until your fan starts whistling or blowing weak air to address this simple maintenance task. Head over to Amazon right now to stock up on premium microfiber cloths, magnetic screwdrivers, and eco-friendly air dusters to make your next cleaning session an absolute breeze.
Top-Rated Picks


| Product | Brand | Rating | Reviews | Price |
|---|---|---|---|---|
| iLiving – 24" Wall Mounted Exhaust Fan – Automatic Sh… | iLiving | ★ 4.7 | 849 | $251.99 |
| Air Vent Gable Ventilator 53315 Attic and Whole House… | Air Vent | ★ 4.4 | 879 | $98.72 |
| CX24DDWT Direct Drive 2-Speed Whole House Attic Fan w… | MaxxAir | ★ 4.1 | 918 | $459.99 |
| Quietcool QC CL-7000 RF Classic Advanced Whole House … | QuietCool | ★ 4.6 | 89 | $1,449.00 |
| AC Infinity CLOUDWAY Whole House EC Fan T12, 1600 CFM… | ACInfinity | ★ 4.1 | 54 | $549.00 |


Write Your Review
No reviews yet. Be the first to share your experience!