Whole home humidifier installation is the ultimate upgrade for dry indoor winter air. This simple setup helps maintain a healthy balance of humidity throughout your entire house, protecting wood floors and relieving sinus discomfort. By choosing a reliable model, you can easily transform your living environment into a cozy, warm haven.
Choosing the Right Humidifier Type for Your HVAC
Starting a whole home humidifier installation requires you to select the correct unit style for your furnace. Each option has unique benefits regarding water usage, energy draw, and overall humidification speed. By analyzing your heating system and home layout, you can quickly make a smart choice that ensures maximum winter comfort.
Bypass Humidifiers and Their Efficiency Benefits
Bypass units utilize the pressure differential of your heating system to move air through a moisture pad. This system does not require its own fan motor, making it a highly reliable and energy-efficient option. Homeowners love this style because it has fewer moving parts to break down, which minimizes future repair expenses.
These units must connect to both the supply and return ducts to create a proper air loop. While they take slightly longer to raise moisture levels, they offer incredibly consistent output during active heating cycles. This gentle approach is perfect for maintaining stable humidity levels in small to medium-sized residences.
Fan-Powered Humidifiers for Active Moisture Control
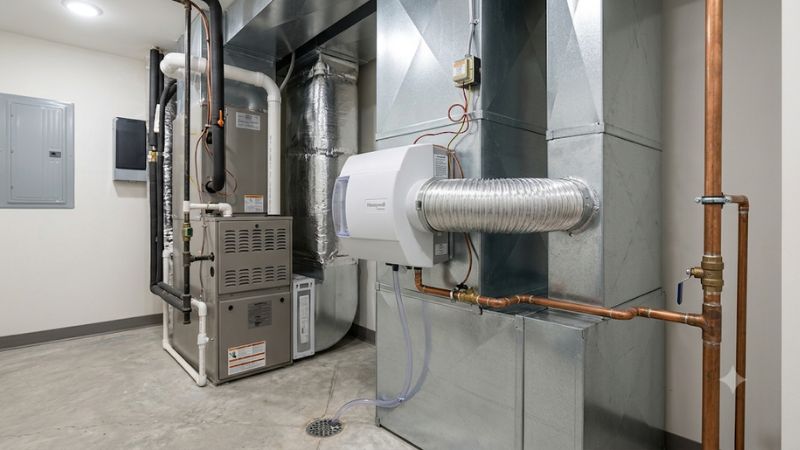
If you need a more proactive solution, a fan-powered whole home humidifier installation is ideal. These devices feature an internal fan that actively pulls warm air across the humidifier pad to maximize moisture evaporation. This setup delivers rapid results and works exceptionally well even when your furnace is not heating.
Because they force air through the system independently, they only need a connection to a single duct. This design simplifies the physical setup process and saves valuable utility closet space. They are excellent for larger layouts where standard passive models might struggle to distribute moisture evenly to every room.
Steam Humidifiers for Large Homes and Quick Comfort
Steam models represent the peak of residential humidification technology because they boil water to create vapor. This process operates independently of furnace air temperature, meaning you get pure steam injected directly into your ducts. It is the most effective way to protect delicate artwork, musical instruments, and wood.
Although steam units require more electrical power, they are incredibly efficient with water conservation. They produce virtually zero waste runoff compared to standard flow-through models, saving you money on utility bills. If you want top-tier performance and precise humidity control, steam is always the premium choice.
Crucial Tools and Preparation Steps
Before starting your whole home humidifier installation, you must gather the proper tools and plan the layout. Taking time to prepare your work area ensures that the physical mounting and plumbing connections proceed without unexpected delays. Always review your system blueprint to locate the safest place to mount your new unit.
| Humidifier Type | Best For | Water Efficiency |
| Bypass | Medium homes | Moderate |
| Fan-Powered | Large homes | Good |
| Steam | Extra-large homes | Excellent |
Gathering the Necessary Installation Hardware
Having the correct equipment on hand makes the process much smoother and prevents unnecessary trips to the hardware store. You will typically need a drill, tin snips, a level, a screwdriver, and some high-quality foil tape. It is also wise to wear safety glasses and heavy gloves to protect yourself from sharp metal edges.
In addition to basic tools, you must source the specific plumbing fittings required to tap into your cold water line. Many modern kits include a saddle valve, but using a dedicated tee fitting provides a more secure and leak-proof seal. Planning these small details beforehand guarantees a highly professional end result.
Finding the Ideal Location on the Ductwork
Selecting the exact spot on your duct system is a critical decision that directly affects performance. Typically, the bypass or powered unit is mounted on the cold air return plenum to protect sensitive furnace components. This strategic placement ensures that moisture-laden air is properly warmed before entering your home.
You must also ensure there is enough flat surface area on the metal duct to mount the template securely. Avoid areas directly opposite heating elements or where internal sensors are located inside the plenum. Taking a few minutes to double-check your clearance will prevent costly layout mistakes during the process.
Assessing Existing Electrical and Plumbing Lines
Before making any cuts, inspect the surrounding area for existing electrical wires, gas lines, and water pipes. You need a reliable source of power and a nearby drain for wastewater to ensure a smooth setup. Identifying these utility connections beforehand helps you plan the neatest path for all your external lines.
If you discover that your furnace lacks an easily accessible drain, you might need to install a small condensate pump. This minor addition keeps your basement dry and prevents water pooling around your expensive heating system. Proper planning is the secret to a successful whole home humidifier installation every time.
Step-by-Step Mechanical and Plumbing Connection Guide
Executing a whole home humidifier installation involves precise physical modifications to your sheet metal ducts. You must work carefully to ensure all cutouts are accurate and that the plumbing lines are secured tightly. Following a methodical sequence protects your HVAC system and guarantees a completely leak-free operation.
Cutting the Ductwork Safely and Accurately
The first physical step involves tape-mounting the paper template onto your chosen location on the plenum. Use a permanent marker to trace the cutting lines and mark the locations for the mounting screws. Using a level during this step is highly recommended to make sure your final installation is completely straight.
Next, drill a starter hole inside the marked boundary so you can easily insert your tin snips to make the cut. Work slowly along the lines to avoid bending or distorting the surrounding sheet metal of the duct. Wearing protective leather gloves is essential during this phase to avoid painful cuts from sharp metal.
Plumbing the Water Line to the Humidifier Solenoid
Connecting the water supply to your whole home humidifier installation requires running a small copper or plastic line. It is highly recommended to tap into a cold water pipe near your furnace using a reliable shut-off valve. This allows you to easily turn off the water supply when performing routine seasonal maintenance.
Route the tubing carefully, securing it along joists to prevent sagging or accidental damage from foot traffic. Connect the other end directly to the solenoid valve on the humidifier, making sure to use a brass compression fitting. Always tighten these connections with two wrenches to avoid twisting the delicate valve body.
Mounting the Unit and Checking All Seals
Once the duct opening is cut and plumbing is prepped, you can physically secure the housing to the plenum. Align the unit with your pre-drilled screw holes and tighten the mounting fasteners until the chassis is snug. Ensure the integrated rubber gasket sits completely flat against the metal to prevent air leaks.
Apply a generous layer of high-quality foil tape or duct sealant around the entire perimeter of the chassis. This extra step prevents conditioned air from escaping, maintaining the overall efficiency of your heating system. A tight seal is crucial for redirecting the airflow properly through the wet vapor pad inside.
System Calibration and Humidistat Wiring Essentials
Completing a whole home humidifier installation requires integrating the control wiring with your home heating system. This step ensures that the water valve only opens when the furnace blower is actively circulating warm air. Careful calibration of the controls prevents over-humidification and protects your home structure.
Wiring the Humidistat to the Furnace Control Board
The humidistat acts as the brain of the system, monitoring moisture levels and activating the unit as needed. You must wire this controller to the low-voltage terminal strip inside your furnace cabinet, usually to the hum and common ports. Always turn off the main power to the furnace before opening the electrical panel.
Use standard thermostat wire to make these connections, routing them neatly away from any high-voltage wiring. Secure the connections tightly to prevent loose contacts that could cause intermittent system operations later. Following the manufacturer wiring diagram precisely is the best way to ensure safe and reliable control.
Testing the Airflow Proving Switch Configuration
Many advanced installations utilize a pressure switch to detect when the furnace blower is running. This safety feature prevents the humidifier from operating when there is no air moving through the ducts, avoiding standing water. Testing this switch is a critical part of the initial commissioning process of the system.
To test the switch, adjust your thermostat to call for fan-only operation and verify that the water solenoid clicks open. If it does not activate, check the sensing tube connection to ensure it is receiving sufficient static pressure. Properly calibrating this switch guarantees that your system runs only when needed.
Initial Startup Procedures and Leak Checks
With all electrical and plumbing connections secure, it is time to turn on the main water valve and test the system. Slowly open the valve and closely inspect every connection point for tiny drops of water or dampness. Even a minuscule leak can cause significant structural damage if left unaddressed over several months.
Next, power up your furnace and set the humidistat to its highest setting to force a call for humidity. Verify that water flows smoothly through the distributor tray and evenly saturates the evaporation pad inside. Once you confirm normal operation, reset the dial to your preferred comfortable humidity level.
Enjoying Long-Term Comfort and Health Benefits
A professional whole home humidifier installation transforms your winter living experience by providing clean, comfortable air. Maintaining a stable relative humidity between thirty and fifty percent reduces static electricity and preserves wood furnishings. With regular seasonal pad changes, your system will perform beautifully for years.


Write Your Review
No reviews yet. Be the first to share your experience!