
A rotary duct cleaning kit can clear lint from a dryer vent faster and more thoroughly than a vacuum alone, but the method matters. Used incorrectly, a spinning brush can separate from its rod, damage flexible ducting, push a dense plug farther into the wall, or leave lint near a hot dryer. Those problems can restrict airflow and increase fire risk.
This guide explains how to use a rotary kit on a typical residential dryer exhaust vent. It is not a substitute for professional HVAC cleaning of whole-house air ducts, which requires different equipment. Plan on 30 to 60 minutes for a straightforward job, and work carefully around the dryer’s gas line, power cord, and vent connections. These instructions are current for common home setups in 2026.
As an Amazon Associate we earn from qualifying purchases at no extra cost to you.

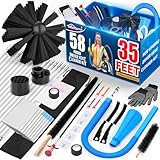
Quick answer: Our top pick in 2026 is the Rotary dryer vent cleaning kit — our #1 rated choice. See the full ranked comparison, alternatives and buying advice below.
What You Need
| Item | Why | Optional? |
|---|---|---|
| Rotary dryer vent cleaning kit | A flexible brush and rods scrub lint from the vent interior. The Gardus RLE202 LintEater kit includes four 3-foot rods and reaches up to 12 feet; it typically costs about $30 to $35. | No |
| Variable-speed drill | Rotates the brush so it can loosen compacted lint. A corded or cordless drill with a standard chuck works. | No |
| Vacuum with hose and crevice tool | Collects loosened lint at the dryer connection and exterior termination instead of letting it spread indoors. | No |
| Screwdriver or nut driver | Removes clamps, screws, and exterior vent covers. | No |
| Work gloves and safety glasses | Protect hands from sharp sheet-metal edges and eyes from airborne lint. | No |
| Replacement foil tape or approved vent clamp | Reseals the joint without restricting airflow. Avoid ordinary duct tape. | Sometimes |
| Drop cloth and flashlight | Protect the floor and help you inspect dark connections. | Yes |
Another option is a longer kit such as the Sealegend 58-piece, 35-foot dryer vent cleaner, which generally sells for about $30 to $40. A longer kit can help with an unusually long route, but more rod sections also create more opportunities for a connection to loosen. Use only as much length as the vent requires.
Step-by-Step
1. Shut down and move the dryer (5 to 10 minutes)
Turn the dryer off and unplug it. If it is gas-powered, close the gas shutoff valve if you can do so safely, and do not kink, stretch, or disconnect the gas line unnecessarily. Carefully pull the appliance forward far enough to reach the exhaust connection.
Remove the clamp or fasteners connecting the dryer to the vent. Do not operate the dryer while the exhaust duct is disconnected. Use the vacuum to remove visible lint from the back of the dryer and the exposed wall connection.
2. Inspect the vent route and exterior outlet (5 minutes)
Go outside and find the dryer exhaust hood. Confirm that its flap opens freely and that birds, nesting material, leaves, or snow are not blocking it. Remove the cover if its design allows, keeping track of the screws. Vacuum loose debris from the outlet.
Estimate the duct length and note bends. Most rotary kits work best on smooth, rigid or semirigid metal venting. A long, sharply angled, crushed, or heavily corrugated route may require professional cleaning or replacement.
3. Assemble the brush and first rod (3 minutes)
Attach the brush firmly to one rod, then insert the rod into the drill chuck. Tighten the chuck fully. Keep the brush rotating in the direction recommended by the kit; reversing the drill can loosen threaded rod connections.
Start with one rod rather than assembling the entire length outside the duct. This makes the brush easier to control and reduces stress on the joints. Set the drill to a low speed. A slow rotation—roughly 200 to 600 revolutions per minute—is usually more controllable than full speed. Never use an impact driver.
4. Clean from the exterior opening when possible (10 to 20 minutes)
For many dryer vents, the safest approach is to insert the brush from the outdoor termination and work toward the dryer. This pushes loosened lint in the direction it normally travels. Insert the brush several inches before starting the drill, then rotate slowly while advancing it gently.
Do not force the brush around a hard bend. Advance only a few inches at a time, then withdraw slightly while the brush spins to help break up deposits. If the rod reaches its limit, stop the drill, hold the exposed rod securely, and add another section. Tighten every connection by hand before continuing.
Keep the rod centered as much as possible. If the brush suddenly becomes difficult to move, stop rotating and pull it back slowly. A stuck brush may indicate a crushed duct, a hidden screen, or a joint that has caught the bristles.
5. Vacuum the loosened lint (5 to 10 minutes)
When the brush reaches as far as practical, switch off the drill before withdrawing it. Pull the brush out while rotating slowly if the kit instructions permit. Vacuum the exterior opening and the dryer-side opening repeatedly. Work in short passes until little or no lint appears.
If the vent is accessible from both ends, clean from the dryer connection as well. Use a shorter brush length and avoid pushing debris into the appliance. Do not insert a bare vacuum hose deeply into a flexible duct where it could puncture or collapse the material.
6. Inspect and repair the duct (5 to 10 minutes)
Look for crushed sections, holes, loose joints, excessive bends, and plastic or thin foil tubing. Dryer exhaust ducts should generally be metal, with as short and straight a route as the installation permits. Replace damaged sections rather than wrapping them with layers of tape.
Reconnect the duct with a clamp or manufacturer-approved connector. Seal rigid joints with foil HVAC tape, not fabric-backed “duct tape.” Keep the route supported and separated from combustible clutter.
7. Test airflow and operation (5 minutes)
Reinstall the exterior cover, plug in the dryer, and reopen the gas valve if applicable. Run the dryer on an air-only or low-heat cycle for several minutes. Check outside to confirm that the flap opens and a strong, steady stream of warm air exits.
Stop immediately if you smell gas, hear scraping, see the duct collapse, or notice unusual heat at the wall or dryer. A vent that still has weak airflow after cleaning needs further diagnosis.
Mistakes to Avoid
- Using high speed: Excessive rotation can damage flexible ducting or make the brush hard to control.
- Reversing the drill: Many rotary rods can unscrew and separate when run backward.
- Forcing a bend: Resistance may signal a crushed duct or obstruction, not a need for more power.
- Cleaning only the lint screen: The screen does not remove lint lodged in the exhaust route.
- Leaving the outside flap blocked: A clean interior cannot compensate for a clogged termination.
- Using plastic vent hose: Replace it with an appropriate metal exhaust duct where local requirements and the appliance manufacturer call for it.
- Operating an unconnected dryer: Exhaust gases and heat must vent outdoors.
- Ignoring gas safety: Do not strain or disconnect a gas supply line to gain access.
How Often
Clean a dryer vent at least once a year for a typical household. Schedule it every six months if you run several loads per day, have pets, wash bulky bedding frequently, or notice longer drying times. Clean sooner when clothing remains damp after a normal cycle, the dryer feels unusually hot, the outside airflow is weak, or the lint screen collects less lint than usual.
When to Call a Pro or Replace
Call a professional if the vent runs through a wall or ceiling you cannot access, extends beyond the reach of your kit, has multiple difficult bends, or remains restricted after cleaning. Professional help is also appropriate for a gas dryer that must be moved substantially, a suspected bird nest, a roof termination, or any installation with uncertain routing.
Replace the duct if it is crushed, perforated, badly corroded, made from plastic, or lined with heavy, immovable buildup. Replace the exterior hood if its flap does not open, its screen is blocked, or it cannot keep pests out without restricting airflow. A new kit is worthwhile when rods are bent, threads no longer lock securely, or the brush has worn down.
FAQ
Can I use a rotary duct cleaning kit on an HVAC air duct?
Not usually. Dryer vent kits are sized and designed for lint removal in a narrow exhaust duct. HVAC supply and return ducts are part of a larger system and may contain insulation, dampers, wiring, or sensitive equipment. Use a qualified HVAC duct-cleaning service for whole-house ductwork.
Should I clean from the dryer side or outside?
Outside-to-inside cleaning is often preferable because lint moves toward the normal exhaust direction and can be vacuumed at the termination. If access is limited, clean from the dryer side with short sections and frequent vacuuming. When possible, inspect and clean from both ends.
How long should a dryer vent cleaning take?
A short, accessible vent usually takes 30 to 45 minutes, including setup and vacuuming. A longer route may take an hour or more. The job should not require force. Persistent resistance is a reason to stop and investigate.
How do I know the cleaning worked?
The exterior flap should open during operation, airflow should feel strong and consistent, and drying times should return to normal. The dryer and wall connection should not become excessively hot. If airflow remains weak, have the entire route, termination, and appliance inspected.
Ready to decide? Our #1 pick for 2026 is the Rotary dryer vent cleaning kit.
Live price & availability on Amazon.


Write Your Review
No reviews yet. Be the first to share your experience!