
A loose dryer vent connection can leak hot, moist air and lint into the laundry room, wall cavity, crawlspace, or attic. That makes the dryer work harder, lengthens drying times, and increases the chance of lint buildup where you cannot easily see it. With a gas dryer, a disconnected vent can also allow combustion byproducts, including carbon monoxide, to enter the home.
Sealing the joint correctly is more than wrapping it in any tape you have nearby. Duct tape can dry out and fall away under heat, while screws placed inside the duct can catch lint. The reliable approach is to make a snug mechanical connection, use a short clamp where appropriate, and seal the outside of the joint with listed foil tape. The following method works for most standard 4-inch dryer ducts and is current for a 2026 home-maintenance routine.
As an Amazon Associate we earn from qualifying purchases at no extra cost to you.

Quick answer: Our top pick in 2026 is the UL 181-listed aluminum foil tape, 2 to 3 inches wide — our #1 rated choice. See the full ranked comparison, alternatives and buying advice below.
What You Need
| Item | Why | Optional? |
|---|---|---|
| UL 181-listed aluminum foil tape, 2 to 3 inches wide | Seals the joint against air leaks and tolerates dryer heat better than cloth-backed duct tape. | No |
| 4-inch metal hose clamp or worm-drive clamp | Holds a flexible duct securely to the dryer outlet or wall collar. | Usually; required when the existing connection is loose |
| 4-inch rigid or semi-rigid metal duct | Provides a durable replacement for crushed, torn, or excessively long flexible duct. | Only if the existing duct is damaged |
| Utility knife or snips | Removes damaged duct and trims foil tape. | Yes |
| Work gloves and safety glasses | Protect hands from sharp sheet metal and eyes from loose lint. | Recommended |
| Vacuum with a narrow attachment and dryer-vent brush | Removes accumulated lint before closing the connection. | Recommended |
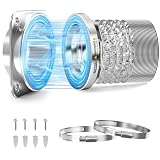
| Magnetic dryer vent coupling kit, such as a 4-inch DV180-style connector | Can make a frequently moved dryer easier to connect and disconnect while maintaining a close-fitting joint. Comparable products may cost about $30 to $40; examples include the ALORAIR DV180 at about $29.98 and a Magnetic Dryer Vent Coupling DV180 kit at about $39.98. | Yes |
Do not use plastic vent hose, vinyl tubing, ordinary masking tape, or standard cloth duct tape. A magnetic connector is not a substitute for an unobstructed, code-compliant vent path; confirm that the kit is intended for a 4-inch dryer connection and install it according to its instructions.
Step-by-Step
1. Shut down and move the dryer (10 to 15 minutes)
Turn off the dryer and let it cool completely. Unplug an electric dryer. For a gas dryer, close the appliance gas shutoff valve if you can reach it safely, and do not strain or twist the flexible gas line. If the dryer is hardwired or the gas connection would be disturbed by moving it, stop and call a qualified professional.
Pull the dryer forward far enough to see the rear outlet and the wall connection. Avoid dragging it across flooring; use an appliance slider or have another adult help. Keep the dryer at least several inches from the wall while you work so the replacement duct will not be sharply crushed.
2. Inspect the loose connection and vent path (5 to 10 minutes)
Look for a separated joint, missing clamp, torn flex duct, crushed sections, corrosion, heavy lint, or foil tape that has lifted. Check both ends: the connection at the dryer’s 4-inch outlet and the connection at the wall collar. A duct that has pulled out of the wall may indicate a damaged or poorly supported vent, not just a loose surface joint.
Also check the outside termination. Its flap should open when the dryer runs and close when it stops. If the vent passes through an attic, crawlspace, or wall, make sure the duct does not end inside that space. Never seal over a blockage or use tape to hide a hole in a concealed section.
3. Clean lint from the accessible area (5 to 15 minutes)
Remove the duct from the dryer and wall collar. Vacuum lint from the dryer outlet, the exposed duct ends, and the wall connection. A dryer-vent brush can help clean farther into a straight, accessible run, but do not force a brush through bends or a long concealed duct.
Do not operate the dryer while the vent is disconnected. Keep the vacuum away from any spilled gas, and if you smell gas, leave the area and contact the gas utility or emergency service.
4. Replace damaged duct and make a straight connection (10 to 20 minutes)
If the flexible duct is torn, permanently crushed, kinked, or longer than necessary, replace it with the shortest practical length of 4-inch metal duct. Semi-rigid aluminum duct is often easier to route than rigid pipe behind a dryer, but it still needs broad bends rather than tight folds. Avoid loops and keep the path as straight as possible.
Slide the duct fully over the dryer outlet or wall collar. If the duct end is too loose to grip, it may be the wrong diameter or the collar may be damaged. Do not reduce a 4-inch dryer outlet to a smaller size to make the joint tighter.
5. Secure the joint mechanically (5 minutes)
Position a 4-inch worm-drive clamp over the duct where it overlaps the metal collar. Tighten it until the duct cannot rotate or pull off, but do not crush the duct. Some metal-to-metal rigid-duct fittings are designed to fit without a clamp; follow the fitting manufacturer’s instructions.
Do not put sheet-metal screws through the interior of a dryer duct. They can collect lint and make future cleaning difficult. If a fastener is specifically required by a fitting’s instructions, use the shortest approved fastener and keep it out of the airflow as much as possible.
6. Seal the outside of the connection (5 to 10 minutes)
Wipe dust from the outside of the joint. Wrap UL 181-listed foil tape around the seam, pressing it firmly into the overlap and smoothing out wrinkles. Add overlapping strips until the entire circumference is covered. Seal the joint at the dryer outlet and the wall collar, but do not tape over a serviceable clamp in a way that prevents inspection.
Foil tape should be applied to clean, dry metal. Do not use tape as the only support for a connection that can be pulled off by hand. The clamp or fitting provides the strength; the tape provides the air seal.
7. Consider a magnetic coupling for a frequently moved dryer (10 to 20 minutes)
If you regularly pull the dryer out for cleaning, a 4-inch magnetic coupling kit can simplify reconnection. Products in the DV180 category commonly use a magnetic interface to help align the dryer-side and wall-side sections. Prices for the examples listed above are approximately $29.98 to $39.98, though prices can change.
Install the coupling only where the manufacturer allows it, keep the two sides fully seated, and verify that the magnets are not being used to support a sagging or damaged duct. Confirm that the connection remains sealed when the dryer vibrates and that the dryer can still sit safely without sharply bending the duct.
8. Test the airflow and finish positioning (5 to 10 minutes)
Restore power and gas, if applicable, and run the dryer on an air-fluff or low-heat setting for several minutes. Check every accessible joint for escaping air, unusual vibration, hot spots, or a duct that begins to separate. Go outside and confirm that warm air and a steady flow are coming from the termination.
Turn the dryer off and let it cool before pushing it back. Leave enough clearance that the duct remains open and does not press hard against the wall. Run a normal load later and check that drying time has not increased.
Mistakes to Avoid
- Using duct tape: Its adhesive and fabric backing can fail under heat and lint.
- Relying on foil tape alone: Tape cannot compensate for a loose, undersized, or damaged duct.
- Installing screws inside the duct: Exposed screw points can trap lint.
- Leaving a crushed flex hose behind the dryer: A 90-degree fold can severely restrict airflow.
- Ventilating indoors: Never discharge dryer air into a room, attic, crawlspace, or garage.
- Ignoring the outside flap: A blocked termination can make an otherwise sealed connection unsafe.
- Moving a gas dryer carelessly: Do not kink, disconnect, or stress the gas line.
How Often
Inspect the dryer vent connection at least once a year and whenever the dryer is moved. Clean the lint screen after every load. Have the entire vent run cleaned when drying times increase, the dryer or laundry room becomes unusually hot, the outside airflow weakens, or lint appears around the connection. Homes with long, concealed, or heavily used vent runs may need more frequent professional cleaning.
When to Call a Pro or Replace
Call a qualified dryer-vent professional if the duct runs through a wall, ceiling, attic, or crawlspace and you cannot verify that it is clear; if the outside termination is inaccessible; or if the vent must be rerouted. Get help immediately if you smell gas, see scorch marks, find melted duct material, or notice carbon-monoxide alarm activity.
Replace the duct rather than patching it when it is torn, crushed, corroded, repeatedly separating, or made from plastic or vinyl. A wall collar that is loose, hidden, or damaged may also need repair. If the dryer overheats or repeatedly shuts down, stop using it until the vent and appliance have been inspected.
FAQ
Can I seal a dryer vent connection with regular duct tape?
No. Use UL 181-listed aluminum foil tape for the air seal, plus a clamp or properly fitted connector for mechanical support. Regular cloth-backed duct tape can lose adhesion and leave the joint loose.
Should I use a clamp on both ends of the dryer duct?
Usually, yes, when the duct connects to a round dryer outlet and wall collar. Tighten each clamp enough to hold the duct securely without crushing it. Follow the instructions for any rigid fitting or magnetic coupling that uses a different attachment method.
Are magnetic dryer vent connectors safe?
A properly sized, manufacturer-approved magnetic connector can be useful, especially when the dryer must be moved for cleaning. It must remain fully seated, unobstructed, and compatible with the dryer and vent system. It does not fix a blocked, undersized, or damaged duct.
Why does my dryer still take too long after I seal the connection?
The restriction may be farther along the vent, at the outside flap, or inside the dryer’s lint chute. A long or sharply bent duct, heavy lint buildup, a failed blower, or a heating problem can also cause long cycles. Stop using the dryer if it overheats and arrange an inspection.
Ready to decide? Our #1 pick for 2026 is the UL 181-listed aluminum foil tape, 2 to 3 inches wide.
Live price & availability on Amazon.





Write Your Review
No reviews yet. Be the first to share your experience!