
Setting up a duct cleaning vacuum correctly helps remove lint, dust, and loose debris without forcing it deeper into a vent system. Done badly, the vacuum can disconnect from the hose, damage flexible ducting, spread dust through the room, or leave a dangerous blockage behind. On a dryer vent, incomplete cleaning can restrict airflow, increase drying time, and contribute to overheating. On larger HVAC ductwork, using the wrong vacuum or sealing method can pull insulation, disturb mold, or release contaminants into the home.
This guide explains how to set up a duct cleaning vacuum for a typical household dryer vent and light-duty duct-cleaning task. It is not a substitute for commercial negative-air equipment when cleaning a full HVAC system, shared apartment duct, chimney, or contaminated ventilation line. Before starting, read the vacuum and dryer manufacturer’s instructions, and disconnect electrical power to the appliance.
As an Amazon Associate we earn from qualifying purchases at no extra cost to you.

Quick answer: Our top pick in 2026 is the Wet/dry vacuum or duct-cleaning vacuum — our #1 rated choice. See the full ranked comparison, alternatives and buying advice below.
What You Need
| Item | Why | Optional? |
|---|---|---|
| Wet/dry vacuum or duct-cleaning vacuum | Creates suction to collect lint and loose debris. For a dryer vent, a compact vacuum with at least 5 to 6 peak horsepower or roughly 900 to 1,200 watts is usually practical. | No |
| Flexible vacuum hose and adapters | Connects the vacuum to a 4-inch dryer vent opening or a larger duct port. A tight connection prevents suction loss. | No |
| Rotary brush and extension rods | Breaks up lint packed inside a straight or gently curved vent. Choose rods long enough to reach the full run, often 12 to 35 feet. | No for heavy buildup |
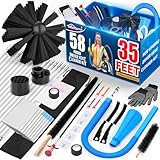
| Sealegend 58-Pieces, 35-Feet Dryer Vent Cleaner Kit | Provides multiple brushes, rods, and attachments for dryer-vent access. Its listed price is about $34.99. | Yes |
| 4-Piece Dryer Vent Cleaner Kit with Dryer Vacuum Hose Attachment | A smaller, lower-cost setup for short, accessible vents. Its listed price is about $13.99. | Yes |
| Foil HVAC tape or approved vent clamps | Secures temporary hose connections. Do not use ordinary cloth duct tape, which can loosen with heat and dust. | Yes |
| Gloves, safety glasses, and a dust mask | Protects your hands and eyes from sharp sheet metal and keeps loose lint out of your breathing zone. | No |
| Drop cloth, flashlight, and screwdriver | Protects floors, improves visibility, and removes the dryer’s vent clamp or access panel. | Yes |
A 4-inch dryer vent should remain 4 inches throughout its run; do not reduce the opening to fit a smaller vacuum hose. For larger HVAC registers, measure the grille or access port first and use a hose and vacuum rated for that duct size. Consumer shop vacuums are not designed to contain asbestos, lead dust, sewage residue, or large quantities of mold.
Step-by-Step
1. Identify the duct and plan the access points (10 minutes)
Trace the vent before connecting anything. For a dryer, locate the flexible or rigid duct behind the appliance and identify where it exits the house. Count sharp bends, note the approximate length, and check for crushed sections. A short run under 15 feet is usually easier to clean from the dryer side. A longer run may require access from both the appliance and exterior termination.
For a room air duct, remove one register and inspect the visible interior with a flashlight. Stop if you see wet insulation, extensive mold-like growth, vermin droppings, or deteriorated duct liner. Those conditions require a professional assessment rather than a household vacuum.
2. Turn off power and create a clean work area (5 minutes)
Unplug the dryer. If it is hard-wired, switch off the correct circuit breaker and verify that the appliance will not start. Turn off the HVAC system before opening a supply or return duct. Move the dryer far enough from the wall to work without sharply bending the vent, but do not strain the gas line. If you smell gas, stop immediately, leave the area, and contact the gas utility or a qualified technician.
Place a drop cloth under the connection and put on eye protection, gloves, and a dust mask. Keep children and pets away from the work area.
3. Prepare and test the vacuum (5 minutes)
Install the vacuum’s dry filter and collection bag, if the manufacturer requires one. Empty the canister first so it can hold the debris you remove. Inspect the power cord, hose, seals, and electrical outlet. Do not use a wet-mode vacuum configuration for dry lint unless the instructions specifically allow it.
Turn the vacuum on briefly with the hose attached to confirm steady airflow. If suction pulses, the filter may be clogged or the hose may be obstructed. A vacuum that overheats, emits a burning smell, or trips the breaker should not be used.
4. Build a sealed hose connection (5 to 10 minutes)
Choose the shortest route from the duct opening to the vacuum. Push the adapter fully over the vacuum hose and the vent opening. Secure the joint with a clamp or a few wraps of foil HVAC tape. The connection should be snug but removable; do not permanently seal the dryer vent with adhesive.
For a dryer, never block the vent outlet while the dryer is operating. The vacuum is used while the appliance is off. If you are using a brush kit, attach the vacuum near the opposite end of the duct so loosened lint is pulled toward the collection container rather than into the room.
5. Insert the brush without forcing it (10 to 20 minutes)
Connect the first rod to the rotary brush and insert it into the duct by hand. Add rods one at a time while turning the brush clockwise, if the kit instructions call for rotation. Keep the rods aligned and advance slowly. Do not force the brush through a sharp bend or push it past a damaged section.
Keep the vacuum running during the cleaning pass. Move the brush in and out by 12 to 24 inches at a time, allowing suction to capture loosened debris. If the brush binds, stop rotating, pull back slightly, and inspect the opening. Reversing a rotating brush counterclockwise can unscrew the rods inside the duct.
6. Clean from the opposite end when possible (10 to 20 minutes)
After reaching as far as practical from the dryer, disconnect the equipment and inspect the exterior vent hood. Remove lint from the flap and screen, if present. From outside, insert the brush toward the appliance while the vacuum is connected at the dryer side. Cleaning in both directions is more effective than relying on one long pass, especially where the duct changes direction.
Do not remove an exterior bird or pest screen if it is part of a required safety design unless you can reinstall it correctly. Replace a crushed, disconnected, or excessively flexible duct rather than trying to clean around the damage.
7. Inspect, reassemble, and test airflow (10 minutes)
Shine a flashlight into accessible sections and check that no brush head, rod, tape, or loose material remains inside. Reconnect the dryer using an approved 4-inch transition duct and secure both ends with clamps. Avoid screws that project into the airflow, because they can catch lint.
Restore power and run the dryer empty on an air-fluff or low-heat setting for five minutes. Confirm that the outside flap opens and that air feels steady. Stop if the dryer produces unusual heat, rattling, or a burning odor. A clean vent should not make the dryer cabinet excessively hot or leave clothing damp after a normal cycle.
Mistakes to Avoid
- Using a regular household vacuum alone: Its hose may be too short, too narrow, or poorly sealed for a long vent run.
- Ignoring the exterior termination: Lint can remain packed behind the outside hood even when the interior looks clean.
- Running the dryer during cleaning: Heat and moving air can push debris into the duct or create an unsafe operating condition.
- Forcing rods around bends: This can separate the rods inside the duct or puncture flexible material.
- Using compressed air without containment: It can blow lint into the room, wall cavity, or attic.
- Leaving a loose connection: A gap at the hose or vent joint reduces suction and releases dust.
- Cleaning contaminated HVAC ducts yourself: Mold, asbestos, lead, and pest waste need specialized containment and disposal.
- Relying on price alone: A $13.99 basic kit may suit a short run, while a $34.99 kit with longer rods may be more useful for a 25- to 35-foot route.
How Often
Inspect a dryer vent at least once a year and clean it when lint is visible, drying time increases, the exterior airflow weakens, or the dryer feels unusually hot. Homes with large families, frequent laundry, shedding pets, or a vent longer than 20 feet may need inspection every six months. Clean the lint screen after every load.
Residential HVAC supply and return ducts do not automatically need annual vacuuming. Have them inspected when airflow drops, remodeling dust enters the system, pests get inside, or visible debris collects around registers. Change HVAC filters on the schedule printed on the filter or equipment manual, commonly every one to three months.
When to Call a Pro or Replace
Call a professional when the vent runs through a wall or ceiling with no safe access, exceeds the reach of your equipment, has multiple sharp bends, or remains restricted after cleaning. Professional service is also appropriate for shared building ducts, commercial systems, suspected contamination, or any job requiring roof access.
Replace a dryer transition duct that is crushed, torn, kinked, or made from unsafe plastic or foil material. Rigid or semi-rigid metal ducting is generally preferable where permitted. Replace a vacuum hose if it collapses under suction, leaks at the seams, or has exposed wiring or damaged fittings.
FAQ
Can I use a shop vacuum to clean a dryer vent?
Yes, for loose lint and a short, accessible run, provided the vacuum has a suitable dry filter, a secure adapter, and enough hose length. A brush attachment improves results. A shop vacuum cannot correct a crushed duct, remove contamination inside walls, or replace commercial negative-air equipment.
Should the vacuum be connected at the dryer or outside?
Either location can work, but connect the vacuum where it captures debris rather than blowing it into the room. For a long vent, clean from both ends. Keep the vacuum outside or near the access point that allows the shortest, best-sealed hose route.
How do I know whether the duct is clean?
Look through accessible openings with a flashlight, check that the brush returns with little new lint, and confirm strong airflow at the exterior flap. A normal empty-air cycle should not produce unusual heat or a burning smell. These checks indicate improvement but do not certify hidden sections of ductwork.
Is a dryer vent kit safe for HVAC ducts?
Usually not without careful evaluation. Dryer brushes and rods are sized for narrow, relatively smooth vents and can damage flexible HVAC ducting or internal insulation. For whole-home heating and cooling ducts, use a qualified contractor with equipment designed for the duct material and contamination level.
Ready to decide? Our #1 pick for 2026 is the Wet/dry vacuum or duct-cleaning vacuum.
Live price & availability on Amazon.


Write Your Review
No reviews yet. Be the first to share your experience!