
A bent or crushed dryer vent hose looks like a minor cosmetic issue, but a kinked hose quietly creates expensive and dangerous problems. Airflow drops sharply when a standard 4-inch flexible duct is pinched by even 30 to 40 percent, so moist hot air stays trapped inside the dryer drum and duct. That forces the heating element to run longer and hotter, driving up energy use by 20 to 30 cents per load and adding $50 to $80 per year to utility costs for a family doing five loads a week. Lint that should vent outside accumulates at the bend, raising the risk of overheating and fire, and damp air can push back into the laundry room, leading to musty odors, peeling paint, and mold behind the dryer. Fixing the bend correctly restores full airflow, shortens drying time from 75 minutes back to 35 to 45 minutes, and protects your machine. The repair in 2026 follows the same safety principles as always: disconnect power and airflow, reshape or replace the hose with the right diameter, and secure it without creating a new restriction.
What You Need
| Item | Why You Need It | Optional? |
|---|---|---|
| 4-inch diameter dryer vent hose (aluminum semi-rigid or flexible foil, 3 to 8 feet long) | Replaces a hose that is creased, torn, or crushed beyond repair. Standard dryers use a 4-inch outlet. A 3-foot hose works for close wall connections; 8 feet gives extra length for offset vents. | No, if hose is damaged |
| Worm-drive clamps (4-inch, stainless steel, 2 pack) | Creates an airtight seal at the dryer and wall vent. Holds at 35 to 50 inch-pounds of torque without cutting into the duct. | No |
| Foil HVAC tape (rated to 200 degrees F) | Seals small pinholes and joints. Unlike cloth duct tape, it will not dry out and fail from heat. | Yes |
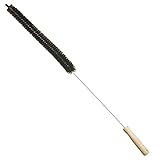
| Vacuum with crevice tool and lint brush kit (24 to 36 inches long) | Removes lint packed at the bend and inside the wall cap before you reseal the system. | No |
| Screwdriver or 1/4-inch nut driver | Tightens and loosens worm-drive clamps. | No |
| Work gloves and dust mask | Protects hands from sharp foil edges and lungs from lint dust. | No |
| Periscope or offset dryer vent box / vent elbow | Solves tight-space kinks where the dryer sits less than 5 inches from the wall. Depth ranges from 2.5 to 4.5 inches. | Yes, for tight closets |
For reference, two common replacement options shoppers compare are the Heavy Duty 4″ Flexible Dryer Vent Exhaust Duct Hose 3 Feet at around $8.99, which is ideal for short, straight runs behind a dryer that sits close to the wall, and the TEAIERXY 4 Inch 8FT Dryer Vent Hose, Flexible Insulated Air Ducting, Vent Hose PVC Aluminum Foil with 2 Clamps for HVAC Ventilation (Grey) also at around $8.99, which provides extra length and included clamps for longer or offset installations. Similar 4-inch flexible aluminum and PVC-foil hoses typically range from $8 to $18 depending on length and insulation.
As an Amazon Associate we earn from qualifying purchases at no extra cost to you.


Step-by-Step
Most bent-hose repairs take 30 to 60 minutes total. Work with a cool, empty dryer and have a helper if you need to move a stacked or 150 to 200 pound unit.
Step 1: Disconnect Power and Pull the Dryer Out – 10 minutes
Unplug an electric dryer from its 240-volt outlet. For a gas dryer, turn the gas supply valve to the off position and then unplug the 120-volt power cord. Pull the dryer away from the wall until you have at least 24 to 36 inches of working space. Lay a moving blanket or cardboard underneath to protect the floor and make sliding easier. Do not pull by the hose itself.
Step 2: Detach and Inspect the Hose – 5 minutes
Loosen the worm-drive clamps at both ends with your screwdriver or nut driver and slide the hose off the dryer exhaust port and wall vent pipe. Hold the hose up to a light and look inside. A gentle bend that springs back is repairable. A sharp crease with cracked foil, white vinyl that is discolored or brittle, holes, or crushed ridges that will not hold a round shape means you should replace the section rather than reshape it.
Step 3: Clean Out Lint at Both Ends – 10 minutes
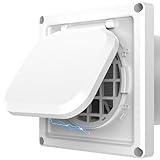
Vacuum lint from the dryer outlet, the inside of the hose, and the wall vent opening. Push a flexible lint brush through the wall duct as far as it will easily go, then vacuum again. Check the exterior vent cap outside your home to confirm the damper flap opens freely and is not clogged. Even a half-inch layer of lint reduces a 4-inch duct’s effective diameter by 25 percent.
Step 4: Reshape a Mild Bend or Fit the New Hose – 10 minutes
For a mild bend in a semi-rigid aluminum hose: Gently work the kink with both hands, rolling the duct back to a round profile. Do not use pliers or over-bend in the opposite direction, which weakens the foil. The hose should hold a smooth curve with a minimum bend radius of about 6 to 8 inches.
For replacement: Uncoil the new hose fully and stretch it to length. Avoid leaving extra coiled length bunched behind the dryer, which creates a new bend. If your dryer sits within 4 to 5 inches of the wall, install a periscope box or a 90-degree aluminum elbow first, then connect the flexible hose to that fitting to eliminate an immediate 180-degree crush.
Step 5: Reconnect With Proper Clamps and Tape – 5 minutes
Slide a 4-inch worm-drive clamp over each end of the hose before fitting it. Push the hose at least 1.5 to 2 inches onto the dryer collar and wall pipe, then position the clamp about 0.5 inches from the end and tighten until snug. The hose should not rotate easily but the clamp should not cut through the foil. Wrap a single band of foil tape around the seam for an extra seal if needed. Do not use screws that penetrate the duct, which catch lint, and do not use cloth duct tape as the primary fastener.
Step 6: Create a Smooth Run With No Sags – 5 minutes
Arrange the hose in a single, gradual arc between the dryer and the wall. Support any horizontal run longer than 24 inches so it does not sag and collect lint and moisture. Leave a slight amount of slack, about 2 to 4 inches, so the hose is not pulled taut when you push the dryer back, but trim any excess length that forces an S-shaped kink. The ideal run is under 25 feet total with bends, subtracting 5 feet for each 90-degree turn.
Step 7: Test Airflow and Heat – 10 minutes
Plug the dryer back in, turn on gas if applicable, and run the dryer empty on high heat for 3 to 5 minutes. Go outside and confirm strong, warm airflow at the exterior cap and that the damper is fully open. Inside, feel along the hose for air leaks and listen for whistling that indicates a restriction. A normal repair will cut drying time on a medium 7 to 8 pound load of towels from more than 70 minutes back to the 35 to 50 minute range. If clothes are still damp after one cycle or the top of the dryer feels unusually hot to the touch, recheck for a hidden kink.
Mistakes to Avoid
Avoid pushing the dryer flush against the wall to save space. Most installations need 4 to 6 inches of clearance to maintain a round hose profile, or a low-profile periscope fitting. Do not use white vinyl flex hose, which is not heat rated and can sag and trap lint, or thin plastic duct that can melt near the 150 to 160 degree F exhaust stream.
Do not over-tighten clamps with a power driver until the aluminum tears, and do not seal joints with standard gray duct tape, which loses adhesion above 120 degrees F and leaves residue. Never run the dryer without a hose in place to test it, which floods the room with carbon monoxide risk on gas models and dumps 1 to 2 gallons of moisture per load into your home. Finally, do not leave 6 to 10 feet of extra flexible hose compressed behind the dryer because you bought a longer hose than needed. Excess length should be trimmed or replaced with the correct size to keep airflow straight.
How Often to Check
Inspect the hose visually every 3 months by pulling the dryer forward slightly with a flashlight and checking for bends, sags, or lint at the clamps. Deep clean the entire vent path every 6 to 12 months depending on use. Households doing more than 6 loads per week, homes with pets, or ducts longer than 15 feet with two or more bends should clean every 6 months. Replace a foil or semi-rigid flexible hose every 3 to 5 years, or sooner if it shows creases that will not hold shape, pinholes, or corrosion. Rigid metal duct in the wall can last 15 to 20 years if kept clear and dry.
When to Call a Pro or Replace Instead of Repair
Reshaping works for a single gentle bend in an otherwise sound aluminum hose. Replace the hose entirely if the diameter is crushed to less than 3 inches, foil is torn, or you see burn marks or melted spots. The cost for a replacement flexible hose and two clamps is typically $10 to $25, while a professional vent cleaning and inspection usually ranges from $90 to $200.
Call a licensed technician if you find lint packed deep inside a long wall duct you cannot reach, the exterior cap does not open, the dryer still overheats and shuts off after your repair, you smell gas at any point, or the vent run is longer than 35 feet or routes through an attic or crawlspace with rigid duct that may be disconnected. A pro can measure back pressure with a manometer, which should read under 0.75 inches water column for most residential dryers, and can install rigid smooth-wall metal duct that improves airflow by up to 30 percent over flexible hose in long runs.
FAQ
Can I just straighten a bent dryer hose with my hands?
Yes, if the hose is semi-rigid aluminum and the bend is smooth without a sharp crease or tear. Gently roll it back to a full 4-inch round opening and ensure it holds shape. If the foil stays folded, is punctured, or springs back to an oval, replace that section. Always clean out lint at the kink before reshaping.
Is foil or semi-rigid aluminum better than plastic for dryer vents?
Semi-rigid aluminum and flexible aluminum foil rated for dryer use are the only safe choices for the section behind the dryer. They handle 150 to 160 degree F exhaust, resist sagging, and are less likely to trap lint than white vinyl or thin plastic. For long runs inside walls, smooth rigid metal duct is best. Check your dryer manual, as many brands void the warranty if vinyl hose is used.
Why does my dryer still take two cycles to dry after I fixed the bend?
A remaining restriction is the most common cause. Recheck that the hose has no hidden S-bend, that the wall duct and exterior damper are clear, and that you did not leave excess hose bunched up. Also clean the lint screen, confirm the washer is spinning clothes to about 50 to 60 percent residual moisture, and verify the vent run does not exceed 25 feet with bends. If airflow outside still feels weak, schedule a full duct cleaning.
How much clearance do I need behind the dryer to prevent future kinks?
Leave at least 4 to 6 inches between the back of the dryer cabinet and the wall for a flexible hose to form a gradual curve. If your laundry closet is tighter than that, use a 2.5-inch deep periscope box or a rigid 90-degree elbow so the connection turns sideways without crushing. Keep the hose length as short and straight as possible, ideally 3 to 5 feet for most closets, and avoid stacking boxes or detergent containers that push against the hose.






Write Your Review
No reviews yet. Be the first to share your experience!